
In the first part of this series, I discussed some of the core concepts surrounding embedded Linux, with the ultimate goal of empowering you to be able to build inexpensive embedded Linux systems.
This part will look at some of the many, many devices you can use to develop with. I’ll also discuss some of the individual components you might use if you’re building your own.
I will also recommend that you buy a couple (very cheap) development tools. These will follow you from project to project.
Finally, I’ll provide a shopping list so you can follow along in the next Mastering Embedded Linux post, where we’ll compile Linux from source code and boot it on hardware.
Your main options are any combination of the following:
- Buy it—it’s hard to beat a drop-in board.
- Hack it—so many devices out there run Linux, like routers and cameras. You can reprogram these with a little effort.
- Build it—to get the perfect form factor and functionality, flex your hardware development skills and build your own Linux-powered board.
To me, Linux hardware is a lot of fun, because the form factors are endless. A bit of warning: the deeper into the weeds you go, the more you must be prepared to order boards from overseas manufacturers and wade through poorly-documented resellers. And most of all, you need to have the time and inclination to learn and tinker with these systems.
Let’s look at some individual options for each.
Buy it—single-board computers
The first angle of attack is to look for computers that are explicitly marketed as running Linux all in a single package — a Single Board Computer (SBC). There is an abundance of these, and the numbers only continue to grow.
The iconic Raspberry Pi is a great option for getting started. It has storage, memory, and connectivity in spades. If you are just getting started and would like to follow along with my software tutorial a little later, you cannot go wrong with a Pi. However, the Pi is somewhat bulky compared to some other less well-known boards, and for many embedded applications, it’s a lot of overkill. Also, if you need to rely on the board, the SD card is often considered a single point of failure because of its comparatively poor reliability.
The smaller $5 Pi Zero gets you an entry-level Pi that has 512MB of RAM. The Pi Zero W adds Wi-Fi and Bluetooth for $5 more. Both also offer a neat trick that isn’t found on larger models: they have a USB On-the-Go (OTG) port, which lets it emulate all kinds of functionality when it’s plugged into a computer, like a virtual Ethernet adapter or a flash drive.

Because it’s such a great platform, for much of this series, we’ll use a Raspberry Pi Zero W as our hardware.
There are other popular boards from various companies. OrangePi makes a bewildering array of SBCs. In my mind, the key feature of most of these is their superior interconnection — even the Pi 4 cannot beat some of the features of these boards, including 4G LTE, PCIe, and mSATA adapters. Most of them also include eMMC, which is flash memory that’s designed for embedded, so it is more reliable than an SD card. High-end OrangePi boards can be even pricier than Raspberry Pis, but they make some $10 SBCs too!
The Orange Pi Zero Plus2 is $13 shipped
Finally, there is a very good database of SBCs called Hackerboards. If you want to watch for new ones, keep tabs on sites like Linux Gizmos and CNXSoftware, which offer embedded news and frequently announce new Linux SBCs.
Hack it—repurposed hardware
Lots of existing consumer electronics, especially routers and IP cameras, run Linux just fine. The OpenWRT project targets many of these devices. The downside of these devices is that they are difficult to tinker with because they are typically rather large, bulky affairs (oddly enough) and they lack connectivity; many only have an Ethernet jack externally, and if you pry them open, they might not have convenient debugging headers you would need to be able to reprogram the storage.
Devices like these typically follow a very predictable formula. This isn’t because the engineers are lazy; this formula works in high volume, low margin scenarios. Here is the formula:
- Obscure processor, typically MIPS or ARM
- Small NAND or NOR flash chip containing bootloader, kernel, and rootfs
- One or two “cool” peripherals like Wi-Fi, a sensor, or a camera
- Custom software running within Linux
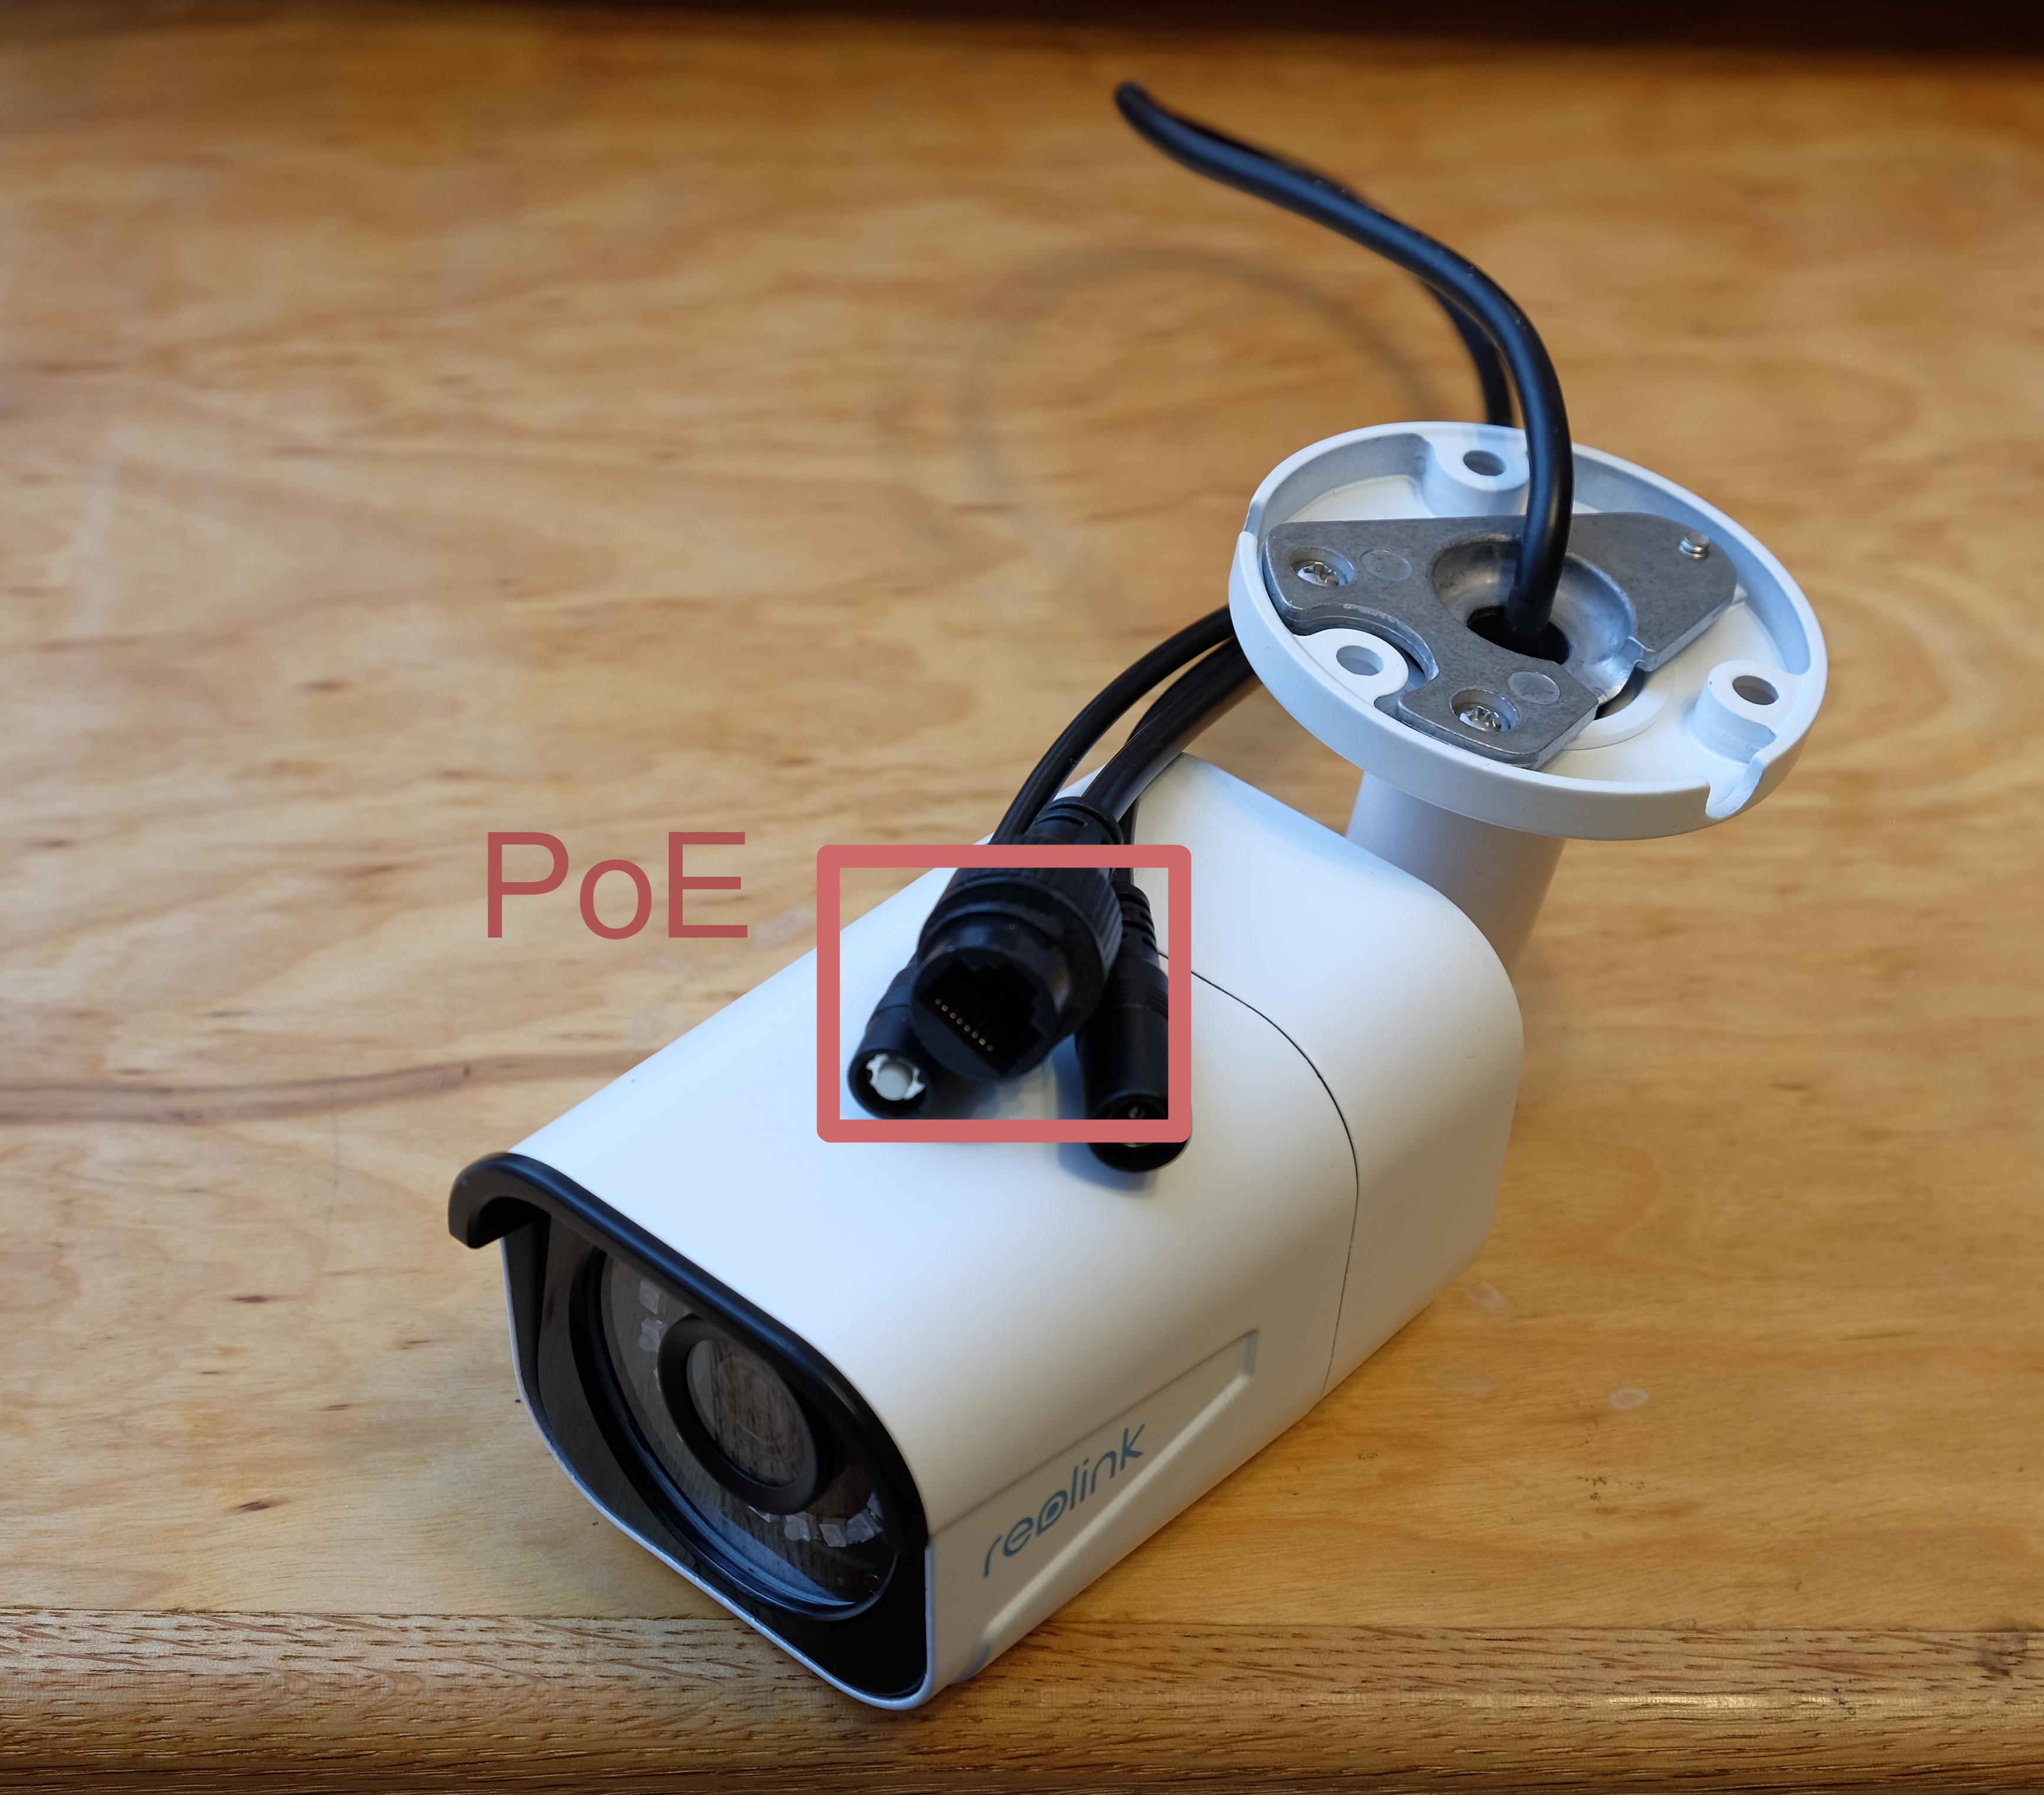
Here’s one of my Reolink IP cameras that runs Linux. This thing has PoE and a 4k camera. Let’s take it apart so I can show you what I mean.
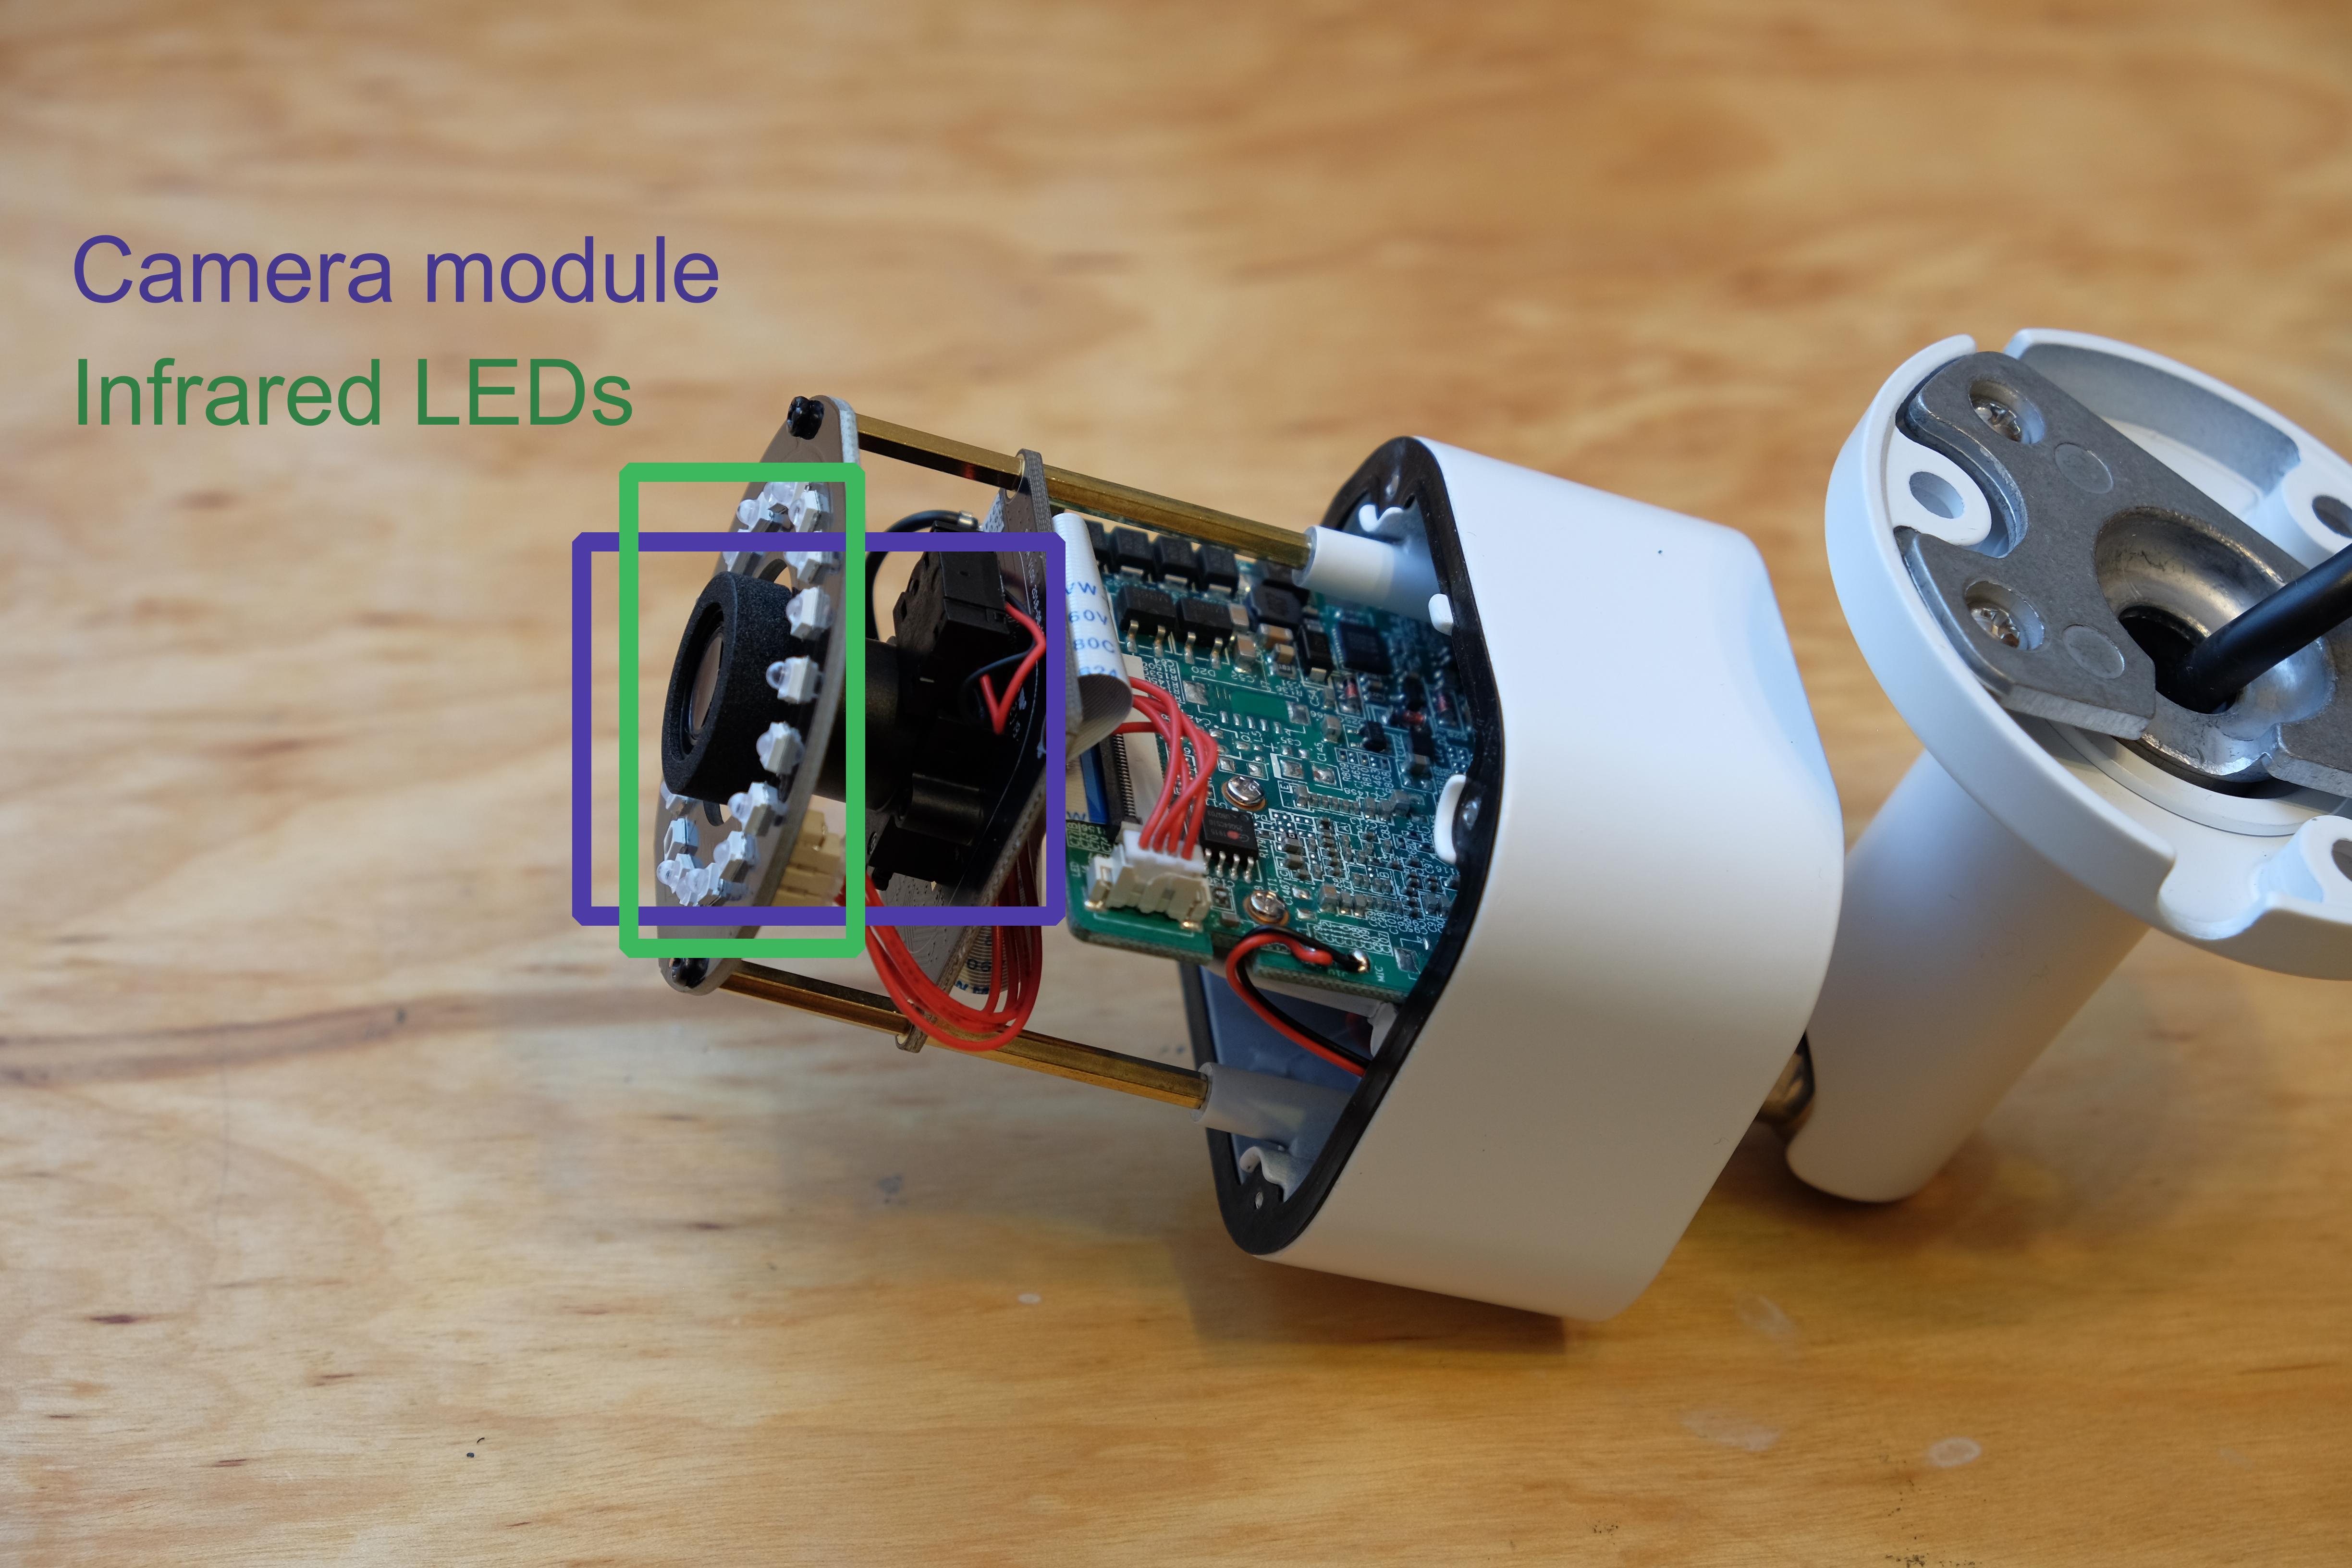
The camera has multiple PCBs stacked into it. Looks like the camera module is separate from the main PCB and connected by a ribbon cable. This is pretty standard.
Let’s look at the front of the main PCB. This thing is an entire Linux computer smaller than a business card. You can see the system-on-chip; it’s a Novatek NT9851x; this appears to be a Chinese MIPS part that you definitely can’t buy in quantities smaller than a jillion. You can also see where there’s a space for a microSD card. It’s not supported on this model (it’s waterproof), but if I needed to, I could probably solder a holder to it and the processor might be able to read the SD card. This would be handy to download more hacking tools to look around while the system is running.
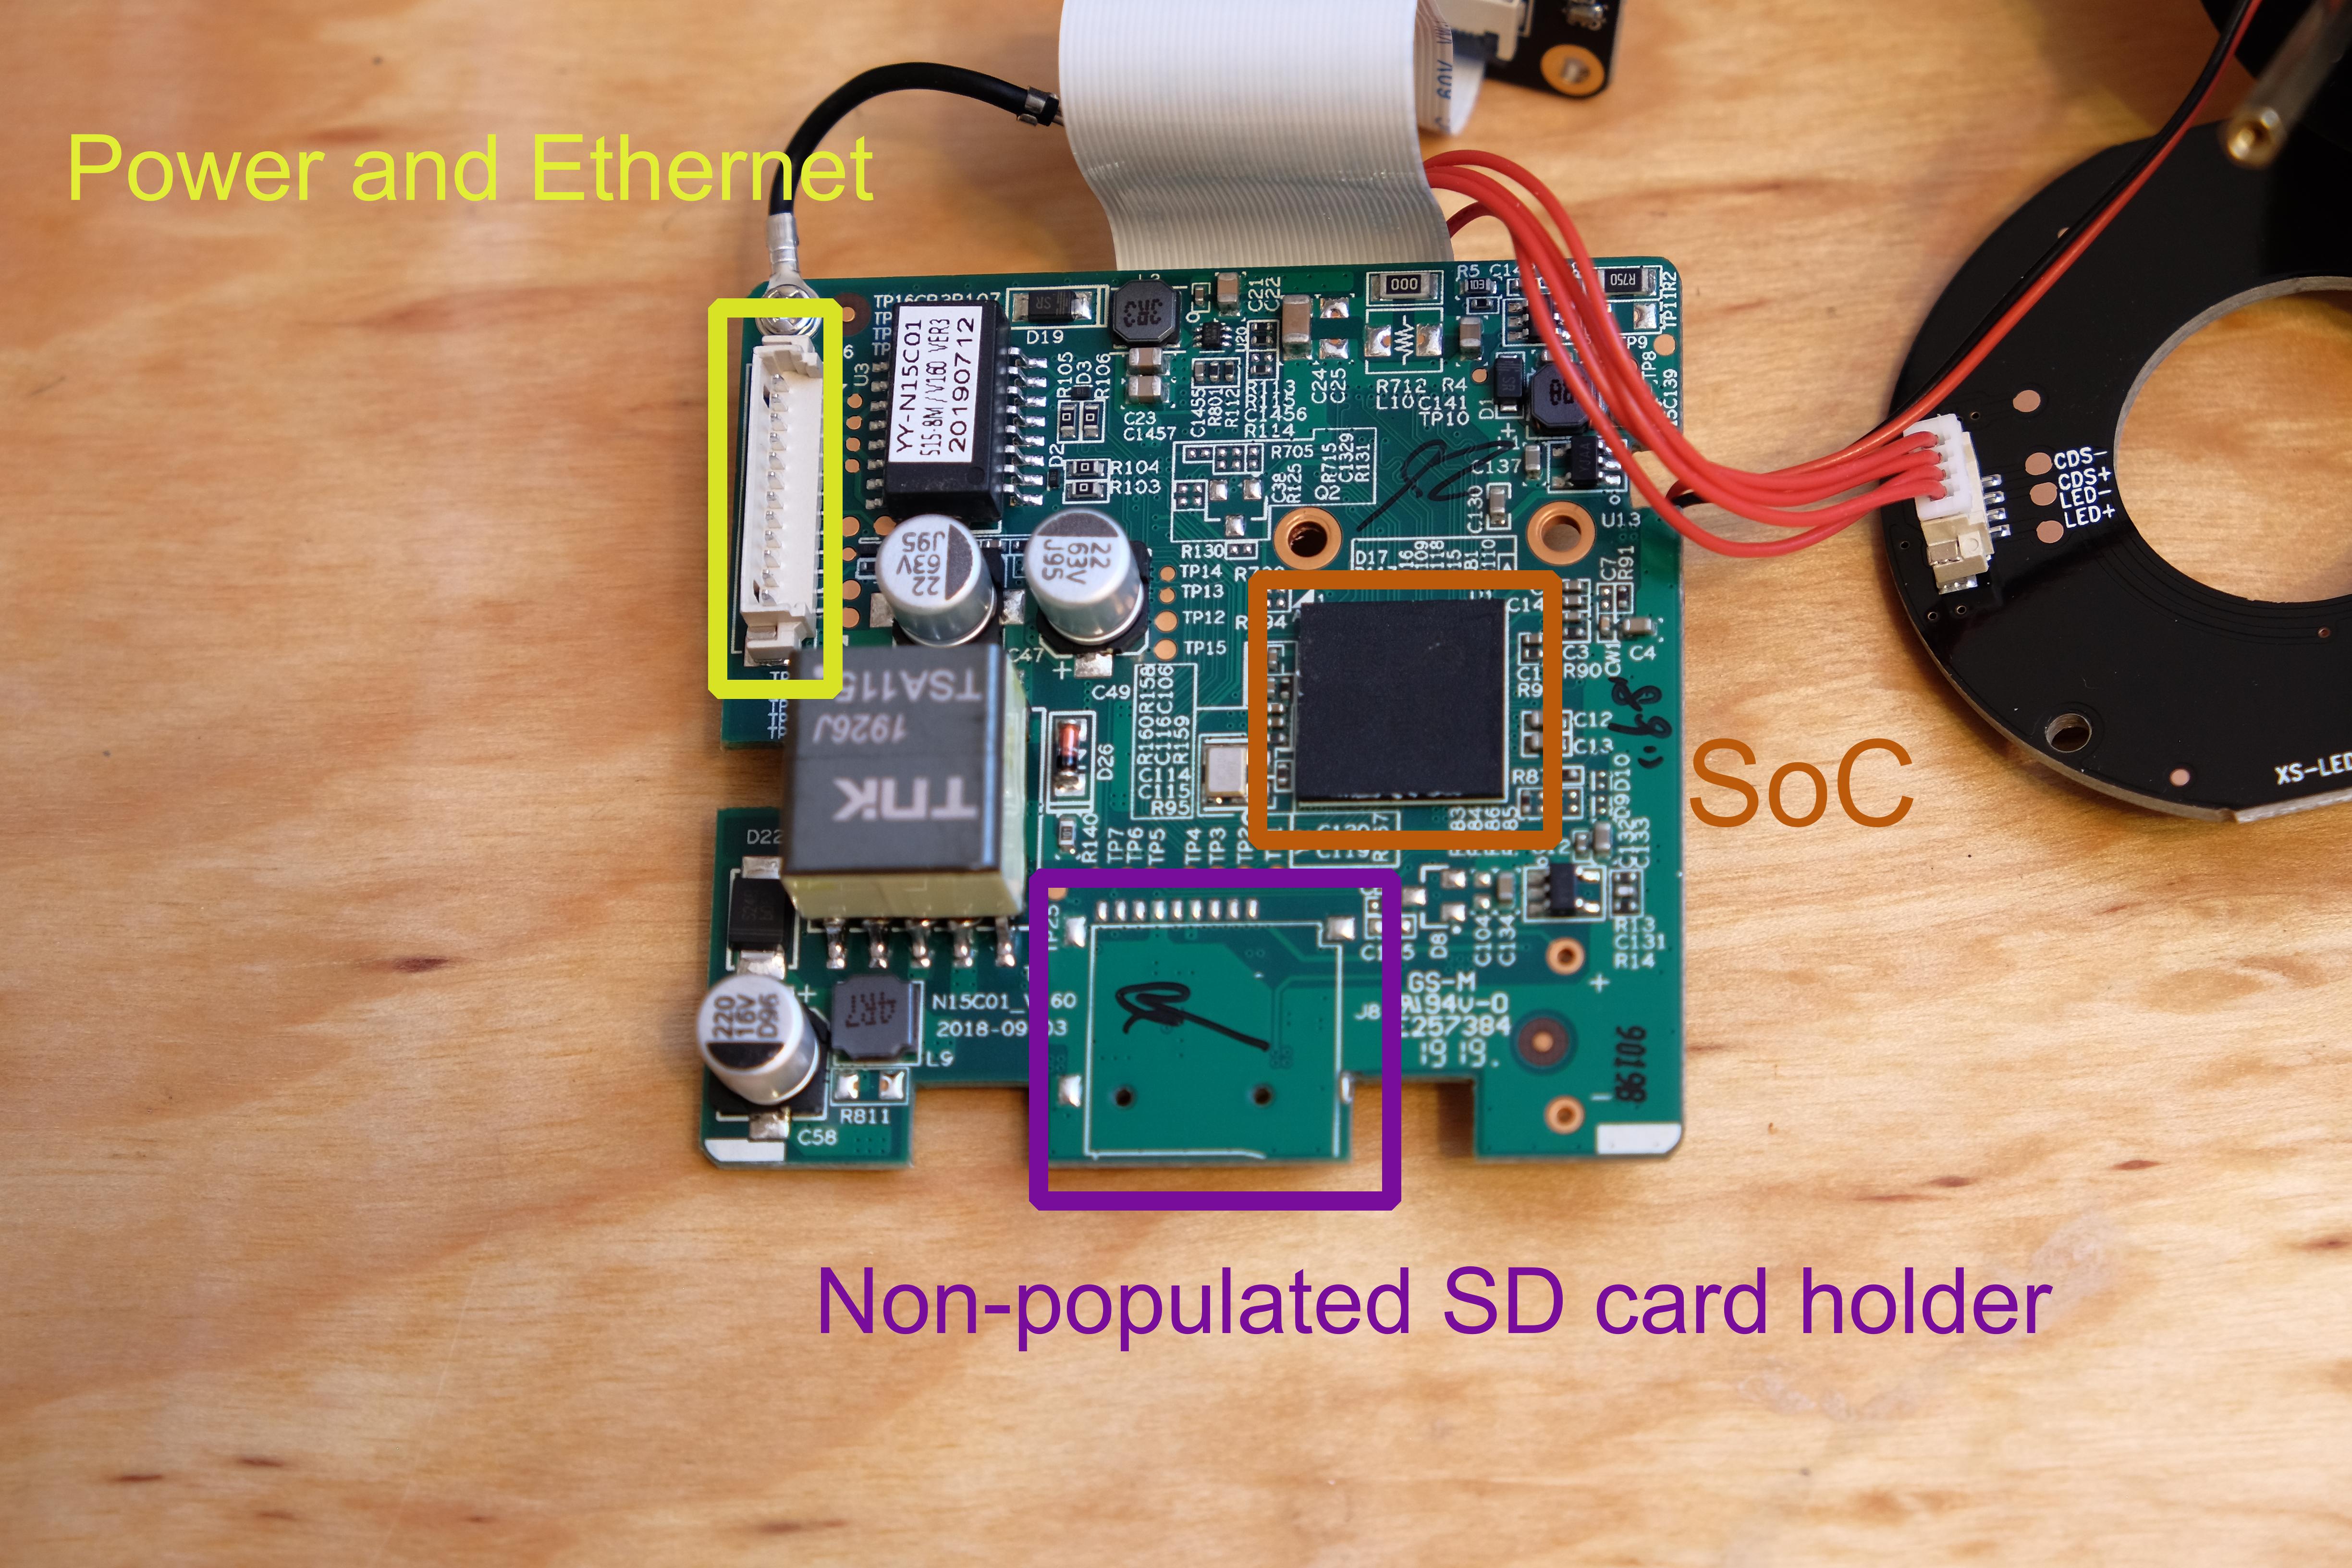
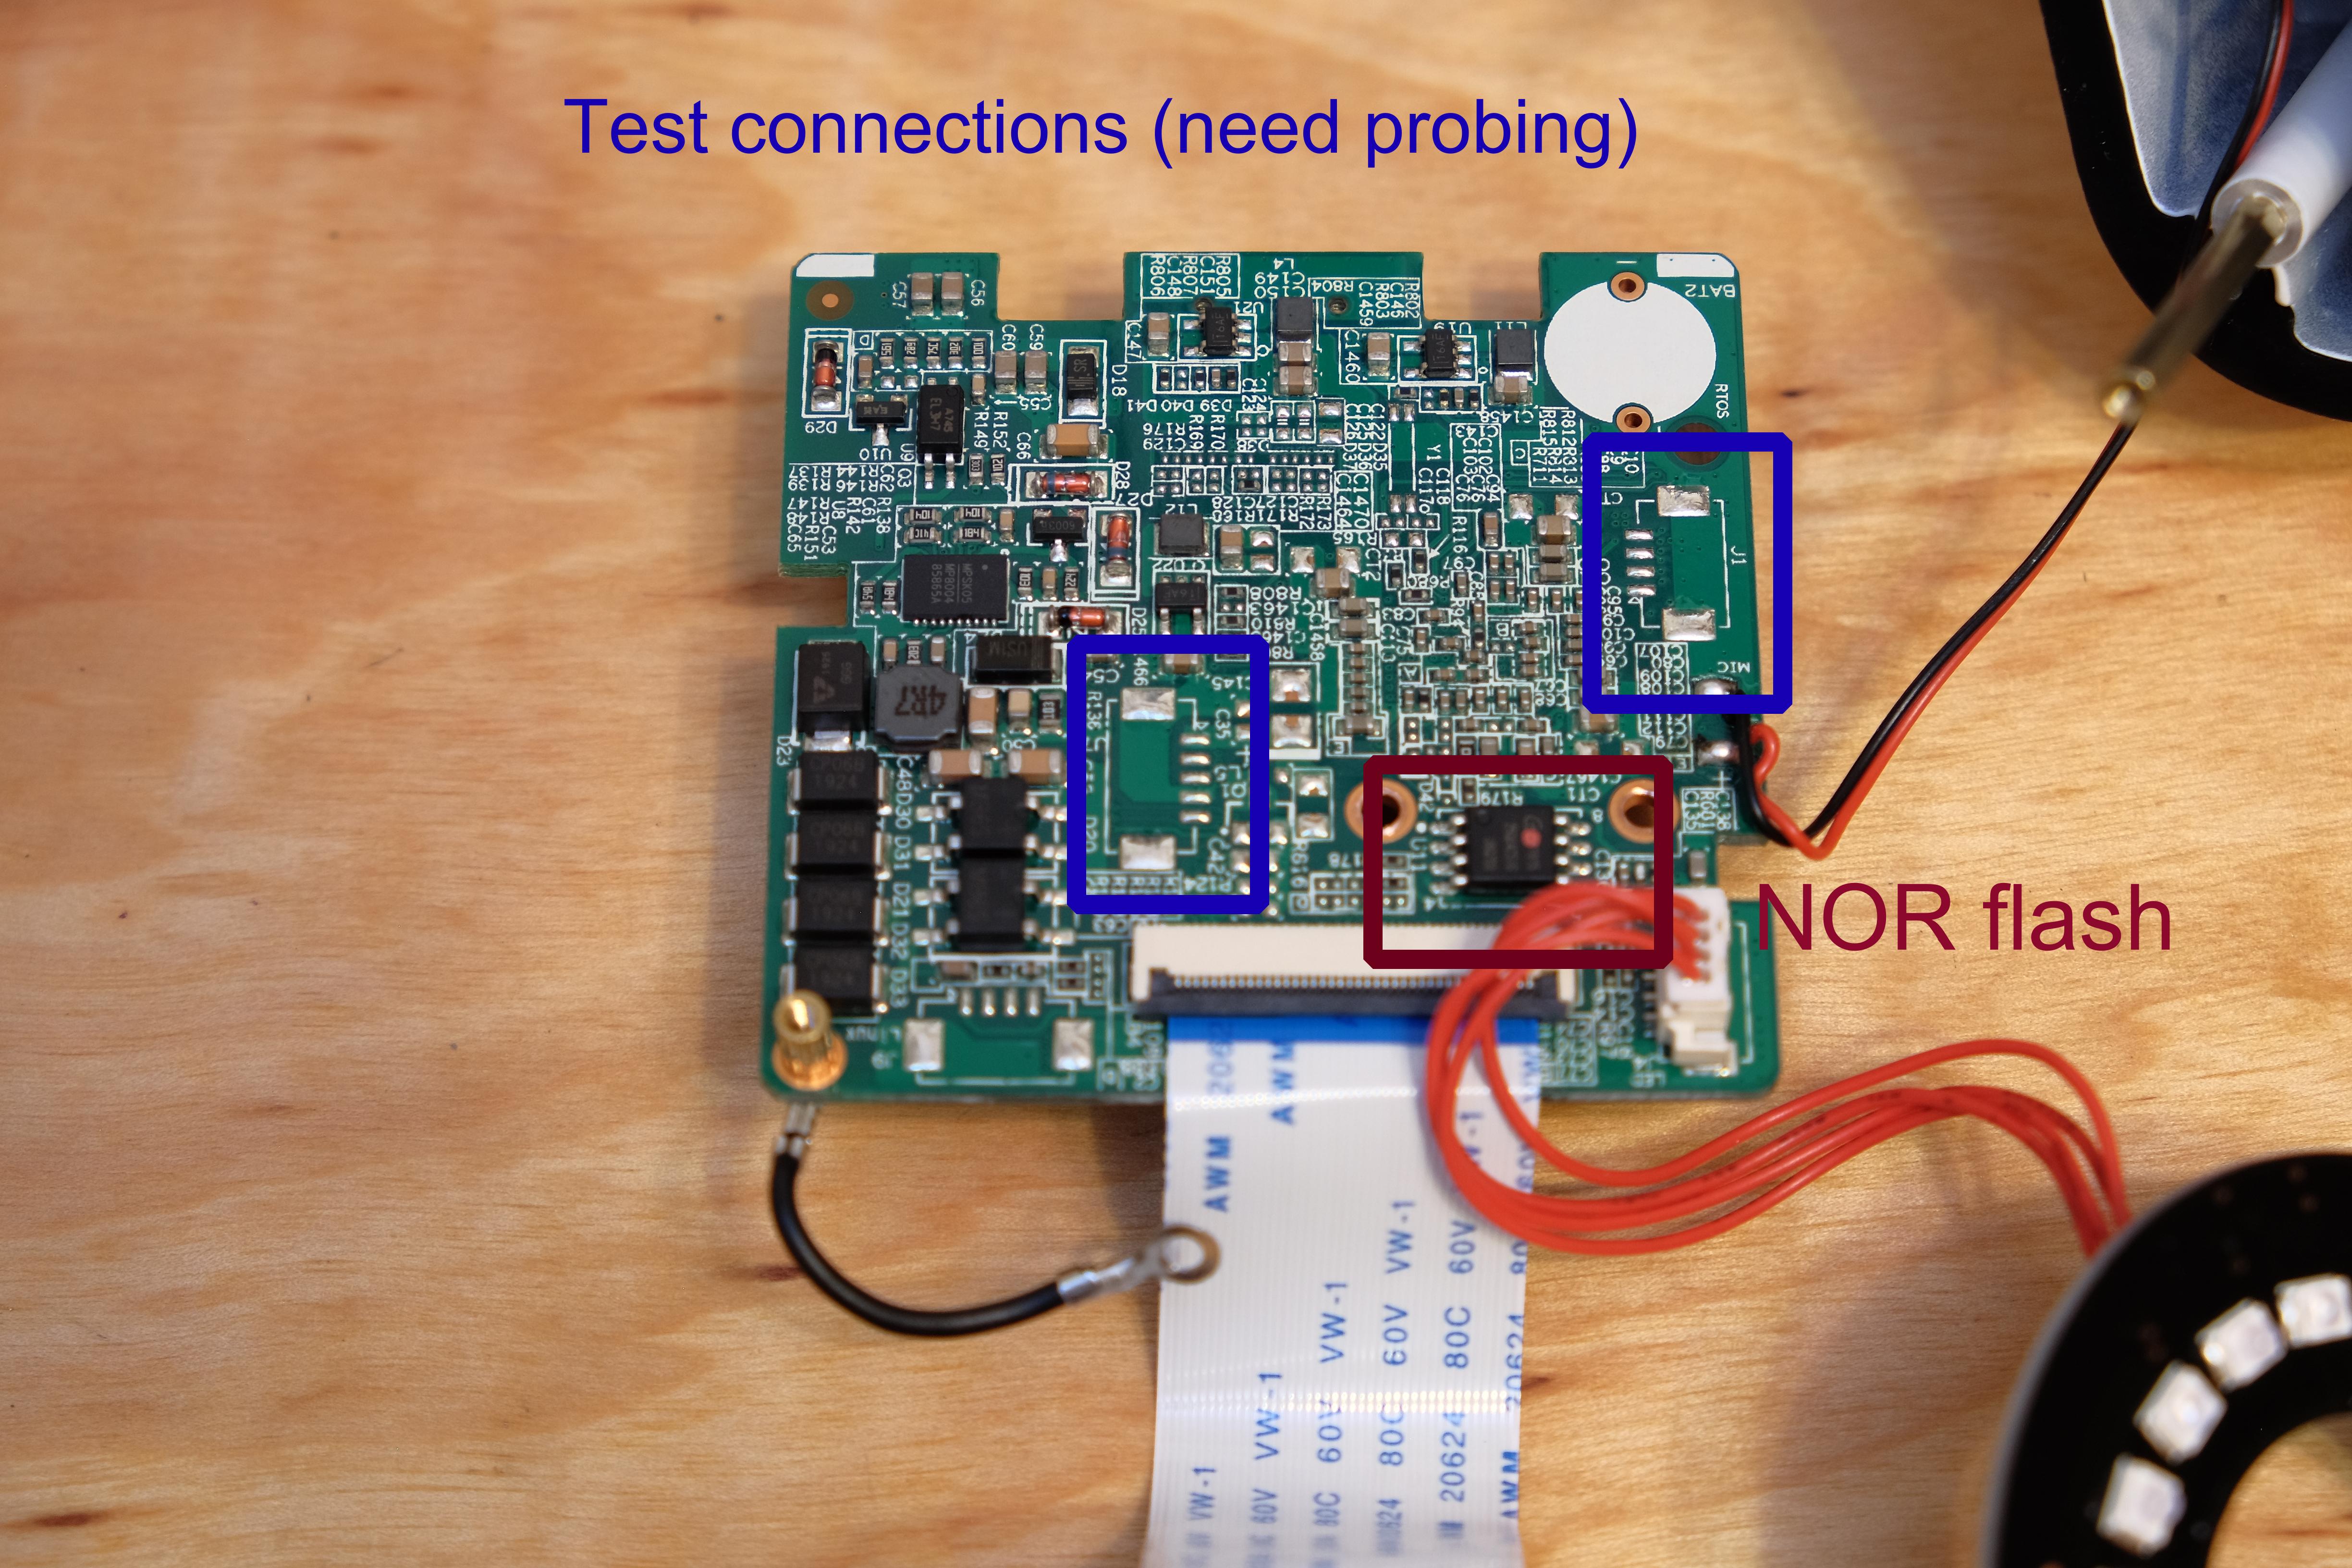
And here’s the back of the PCB. You can easily see the small NOR flash. If I were going to really start hacking this, the first step would be to desolder the flash and clone it using the tools I’ll recommend below; that way I could never truly brick the camera.
There are also a couple of non-populated debug headers. One of the first steps in reverse engineering a device is to see if it has a UART with a shell prompt; I could probe these pins with an oscilloscope to find the console.
And so you see that the pieces of the formula are all here:
- Obscure processor: check, Novatek
- Small NOR flash: check
- “Cool” peripherals: check, camera
- Custom software running within Linux: check
(Spoilers: this camera has been annoying me for some time. Stay tuned for a more thorough reverse engineering.)
Build it—custom boards
If all you want to do is compile Linux from scratch, then grab your Raspberry Pi and skip this section. On the other hand, if you’re building custom hardware that’s going to run Linux, read on.
All these choices are cheap. Typically any single option won’t cost more than $20. Of course there are many embeddable options for much more money, but that isn’t in the spirit of this article series!
Systems on a Module
A “system on a module” (SoM) is a device that packages all the complex parts onto a single module that is ready to integrate with your project. You will still need to build a carrier PCB that the SoM mounts to, but this is comparatively straightforward.
I’m grouping these boards separately from the ones above, for a couple reasons. First, they don’t have all the connectors present on the bigger boards. In turn, they are much smaller, and they are typically designed to be easy to embed into your own project. This makes them a sweet spot for many hobbyists who want to build a board without dealing with ultra-fine-pitch soldering. You can do pretty well with a price cap of $20.
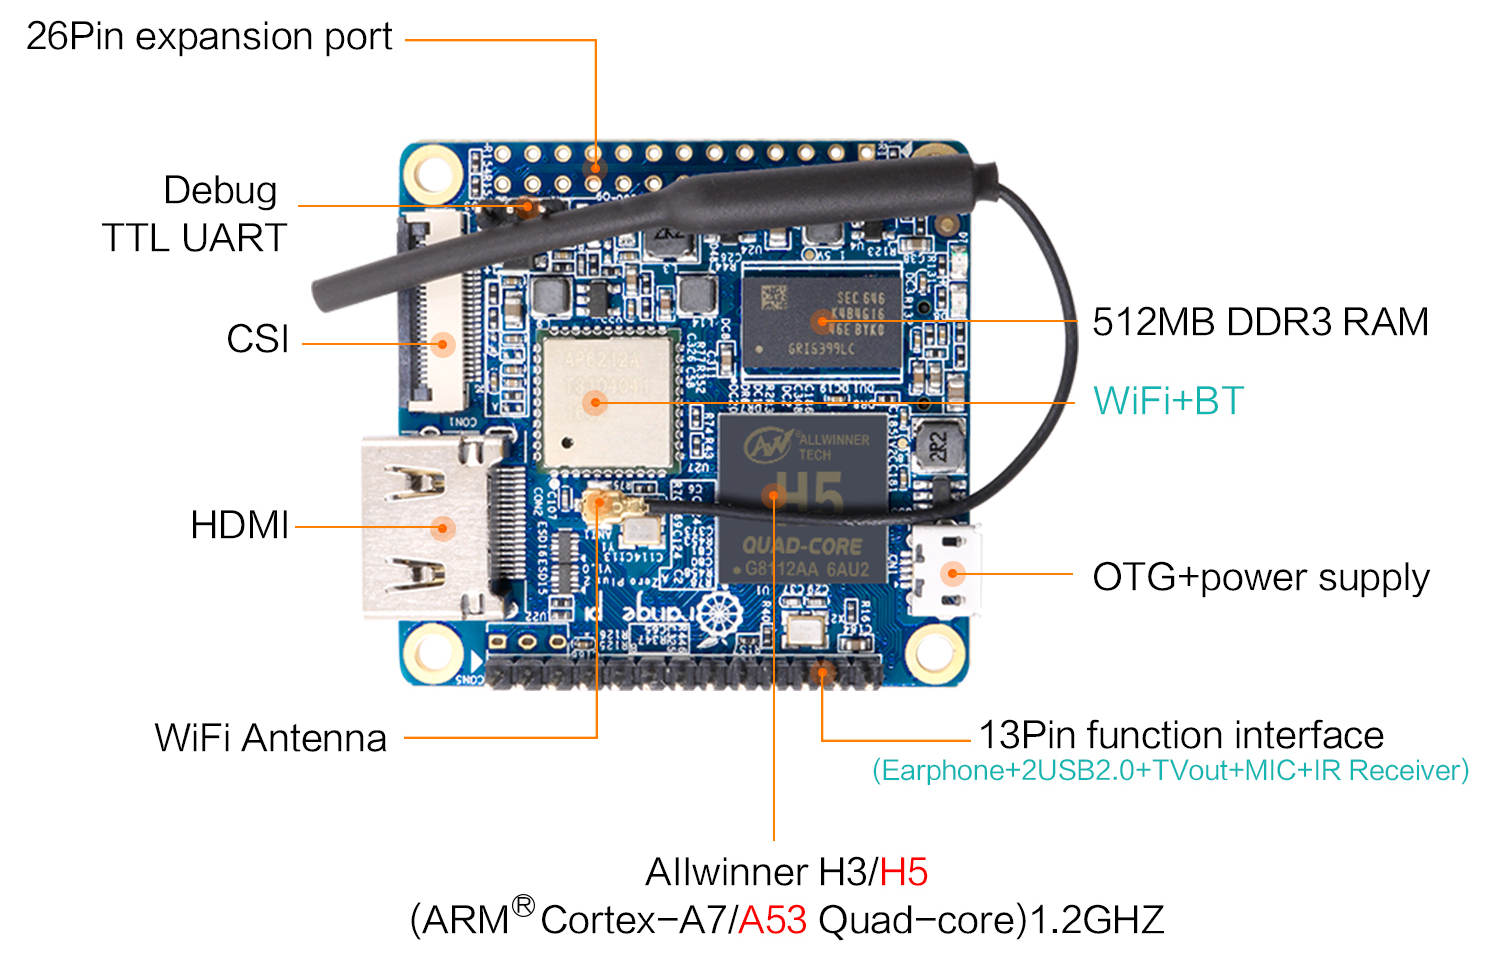
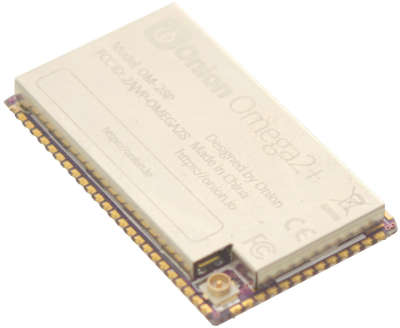
My favorite in this price range is the Onion Omega2S. It’s MIPS-based MT7688 with built-in Wi-Fi plus 64MB of RAM and 16MB of NOR flash, all on a nice package with castellated edges. Even better, it’s available on Mouser. It also has a single-board cousin, the Omega2.
There are a bunch of other SoMs available; they’re pretty easy to find when you Google for them. SoMs are a very popular thing for companies to make because it’s easy to sell in moderate quantities to other companies. Professionally, I use SoMs all the time because it’s cheaper to buy a few for prototypes than it is to design from scratch.
Bare processors
If you’re building a really space-constrained device, or maybe if you just enjoy a challenge, you can’t use a SoM. There are several parts that I’d like to give special mention to.
These parts are great because it’s possible to solder them onto hobby boards without industrial equipment—they come in nice sane QFP or QFN packages (and commercial users will appreciate this too). This list doesn’t include other parts that need external RAM and a lot more TLC. For that reason, people refer to this kind of part as a “system in package.”
- Nuvoton NUC980 series: Nuvoton has a line of ARM9 processors. Although they are underpowered versus modern CPUs, these parts have a ton of peripherals and very good freely available documentation. The parts have varying amounts of RAM depending on the pin count, which varies from QFP64 to QFP216. They also have a development board using this part series called the “NuMaker Tomato.”
- Allwinner V3s: Allwinner is a Chinese semiconductor company that makes a lot of low- and mid-range parts. Often these SoCs end up in tablets or dashcams. The V3s is a particularly powerful example that has the magic combination of a QFP package and built-in 64MB of RAM. Unfortunately it is discontinued; for hobby purposes this is not necessarily a problem, because the parts are still available from the usual low-volume resellers that hang out on eBay, Taobao, and AliExpress. Also note that Allwinner doesn’t always interact with the FOSS community—many of their peripherals have had to be reverse engineered—but if you want good, affordable hardware, they’re hard to beat.
- Allwinner F1C100s: Another Allwinner part that is astoundingly cheap. It’s based on a single ARM9 core and has 32MB of RAM in a QFN package. There are several decent peripherals on board including a display driver, but everything that it includes is honestly table stakes for SoCs these days. Linux support is middling, but it worked well enough for me to build my Linux-powered business card using this part. Overall, at $1 to 1.40 on Taobao, you get what you pay for.
- Sunplus SP7021: This looks like a recently developed part (as of Dec 2019). It powers the Banana Pi BPI-F2S; it has either 128MB or 512MB of RAM, four ARM cores, and a ton of peripherals, all in a QFP package. It’s relatively expensive at $20 apiece, but it packs a ton of horsepower for this price. I am looking forward to trying this in a future project!
- Ingenic X1830: I hesitate to include this BGA part, but otherwise it is a quite capable MIPS core with 128MB of built in RAM. The ball pitch of 0.65mm isn’t too bad, but you might prefer other parts if you’re hand-assembling. Linux support appears to be a mixed bag. Let me know if you have any experience with this part.
Further on in the series, I’ll talk more about building your own. You definitely will need a strong grasp on the basics.
Recommended tools
To interact with the console on your system, you will need a tool that allows you to talk over UART. I also highly recommend you get a tool that allows you to reflash SPI flash memories.
FTDI breakout
You can kill these two birds with one stone by buying a simple breakout board for the FTDI FT2232H, a classic “USB to UART” chip. They are readily available on eBay or Amazon1.
The FT2232H has two channels; each can simultaneously do a different function. Each channel behaves as a UART out of the box, or these programs can use the channel to do other things:
- flashrom can use it to speak to SPI flashes—you can unbrick many routers like this
- OpenOCD can use it to control many processors via JTAG
- Sigrok can use it as a low-speed logic analyzer, in a pinch
- aehparta/ftdi-bitbang will let you manually bit-bang each pin on the command line
Because it’s so versatile, I think of this simple, inexpensive board as my “Swiss Army knife” of embedded device hacking.
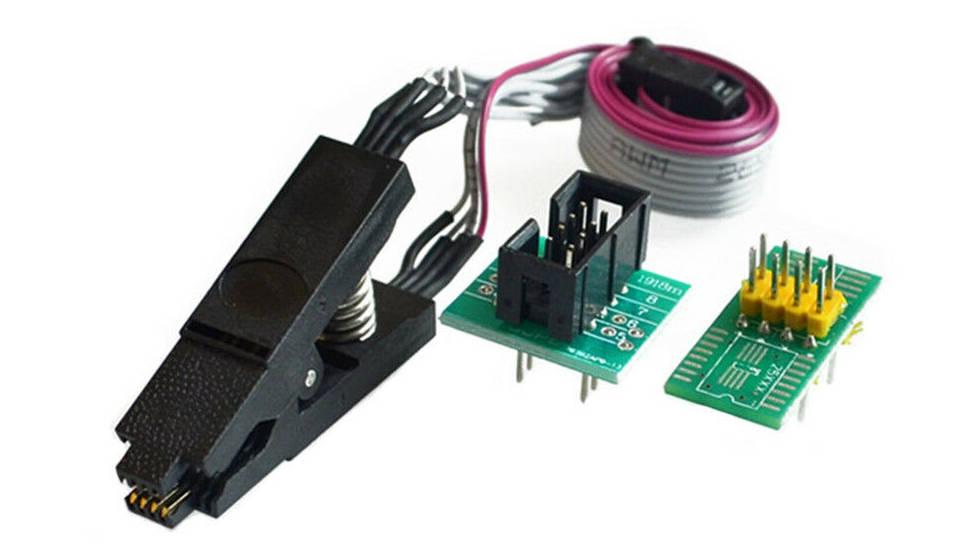
SOP8 test clip
You don’t need this tool if you’re going to be experimenting with a Raspberry Pi, because it can only boot from an SD card. When you start using SPI flash, you will want something that lets you program the parts in-circuit without desoldering them. Buy a very inexpensive “chip clip” to let you connect your FTDI chip to the flashes.
Miscellaneous supplies
Make sure you can wire all this up. I know it sounds silly, but nothing is more irritating than having your project stuck for four days because you’re waiting on more header pins to arrive.
- 0.1" header pins and breadboard wires
- Soldering iron
- USB cables
- A couple small 1GB or 2GB SD cards
Coming Up
In the next article we’ll be compiling our first image from source code. We’ll take the Buildroot distribution for a spin. Buildroot is really easy to get started with if you have a Raspberry Pi, so that’s what we’ll use as an example. Then, in later articles, we’ll build on those base concepts to tackle more advanced software and hardware topics.
We will be doing all of this in a Linux environment on our workstation. If you’re not already running Linux, you can install it in a virtual machine and that should work OK with some caveats.
Needed Hardware
You’ll be able to follow along using just software if you don’t feel like buying anything.
However, if you want to follow along with hardware, I highly recommend that you have the following shopping list1.
- Raspberry Pi Zero W; make sure to get one with header pins so you can connect to its UART
- microSD card; also make sure you have a way to plug this into your computer
- FT2232H breakout; this is a fairly generic little tool so any of the results you find will work. I like the purple ones with CJMCU printed on them.
- Breadboard wires; this lets you connect the breakout to the Raspberry Pi’s serial console.
You might already have some of this lying around. If you have a Pi Zero non-W, don’t rush out and buy the W. You can make do with what you have.
When you’re ready, jump to Part 3 to get started.
Subscribe
Stay tuned! You can subscribe to updates if you’d like to follow along.
-
Some of the links in this article are affiliate links. The proceeds help me keep buying and building neat embedded systems. ↩︎