
This Mastering Embedded Linux article is the first where the rubber hits the road. We’re walking through building Linux from source code and booting it on a Raspberry Pi. Whereas the previous articles have been all discussion, this one is equal parts discussion and tutorial.
This article will introduce Buildroot, a toolkit for building highly customized embedded Linux images. Buildroot is the right combination of “powerful” and “easy to use.” It provides a lot of automation so that your build process can Just Work, freeing you up for doing the interesting parts of embedded Linux development.
In this article:
- We’ll download Buildroot and start the build using just six commands.
- While it compiles, we’ll talk about the steps Buildroot is doing automatically, and what the process looks like conceptually.
- At the end, we’ll walk through booting the freshly built operating system on a Raspberry Pi.
It’s easy and fun.1 Let’s get started.
Prerequisites
To follow along, you will need the things from the shopping list at the end of the last article. The Raspberry Pi will serve as the target hardware, and the FT2232 is the serial adapter that’s needed to communicate with the Pi’s serial console. Or, if you don’t want to buy anything, you don’t have to; you can use a virtual machine as the target instead. I’ll give you the option as I go along.
Regardless of what target you pick, you will also need the following:
- Host workstation running Linux. If you don’t have a favorite distribution, you can install Ubuntu. If you aren’t running Linux, you can use a virtual machine (VM) as the host and that will work okay with some caveats. I am not walking you through this—you’ll need to get Linux on your workstation beforehand.
- 15GiB free disk space. We are compiling an entire operating system; the final result is small, but it needs lots of space to get there. If you use a VM, make sure you give it enough virtual drive space.
- 2–4 hours free time. You’ll need time to read this article, do the build, and play with the result.
- Working knowledge of Linux. You don’t need to be an expert, but it will be good to know how to get around in the shell.
Kicking off Buildroot
We’ll have Buildroot compiling our image in no time. There’s four main steps:
- Install host tools
- Download Buildroot
- Configure Buildroot
- Build the target image
You only need to run six commands to accomplish all this. I’ll tell you what they are.
Install host tools
The first step is to install programs that you’ll need that don’t ship with Buildroot.
- Git: Buildroot provides tar archives, but it’s much easier in the long run to use the Git repository.
- A compiler: Buildroot needs an initial compiler to build its own compilers.
- Miscellaneous tools: Various system utilities that help Buildroot download and preprocess code. Buildroot documents these dependencies.
- screen: A “serial console” utility that will use the FT2232 serial adapter.
Install the tools. (The ~$ in all the commands I give is the shell prompt. Don’t type that. Type what comes after it.)
~$ sudo apt install -y git build-essential wget cpio unzip rsync bc libncurses5-dev screen
That’s pretty much it. Buildroot includes its own tools and just needs these things to get the process started.
(This command is for Ubuntu. It’s the only command in this guide that is distribution-specific. Everything else interacts with Buildroot, not the host operating system.)
Download Buildroot
Buildroot provides multiple ways to get the source code, but the easiest way to do it is to use Git.
Clone the Buildroot tree with Git:
~$ git clone git://git.buildroot.net/buildroot
Cloning into 'buildroot'...
remote: Enumerating objects: 356009, done.
remote: Counting objects: 100% (356009/356009), done.
remote: Compressing objects: 100% (116215/116215), done.
remote: Total 356009 (delta 248969), reused 342974 (delta 238353)
Receiving objects: 100% (356009/356009), 75.76 MiB | 1.36 MiB/s, done.
Resolving deltas: 100% (248969/248969), done.
~$ cd buildroot/
Now we’re in the top level of the Buildroot tree. We need to switch to the exact version of Buildroot we want to build with. In this case, it’s the 2019.11.1 (November 2019) release, which is the latest as of this writing in January 2020.
Check out the 2019.11.1 tag:
~/buildroot$ git checkout 2019.11.1
Note: checking out '2019.11.1'.

You are in 'detached HEAD' state. You can look around, make experimental
changes and commit them, and you can discard any commits you make in this
state without impacting any branches by performing another checkout.

If you want to create a new branch to retain commits you create, you may
do so (now or later) by using -b with the checkout command again. Example:

  git checkout -b <new-branch-name>

HEAD is now at 57fbebac60 Update for 2019.11.1
Easy enough. Git tells us we aren’t on a branch (“detached HEAD”). That’s okay for now.
Configure Buildroot for your hardware
Now, you need to configure Buildroot for your target. The exact command to do this depends on which board you’re building for:
| Target | Command |
|---|---|
| Raspberry Pi Zero W | make raspberrypi0w_defconfig |
| Raspberry Pi Zero | make raspberrypi0_defconfig |
| Virtual machine | make qemu_x86_64_defconfig |
Each of these words after make is a configuration.
You can see all these configurations in the configs directory; more on this later.
~/buildroot$ make raspberrypi0w_defconfig
Buildroot prints each command that it’s running. It’s a lot of gibberish, but you can ignore all of it except the bottom part—that’s Buildroot saying that the configuration is activated:
#
# configuration written to /home/georgev/buildroot/.config
#
Build
We’re now ready to compile the entire operating system. Buildroot makes this easy, but it does take some time: probably 2–3 hours, depending on how fast your workstation is. It also needs an active Internet connection to download source code.
Ready?
Compile the target image:2
~/buildroot$ make
This will start printing lots of text as Buildroot downloads and compiles the various parts of the target operating system image. When it finishes, there will be an SD card image ready to burn onto the Pi’s SD card.
If you’d like to watch instead of doing it yourself, you can press Play on this asciicast:
How Buildroot works
While this compiles, I’ll discuss what each part of Buildroot does.

The best part about being an embedded Linux hacker is that your builds take hours! This gives you plenty of time to write blog posts about embedded Linux. (comic via xkcd)
Compilation flow
From a high level point of view, here is the workflow that Buildroot automates:3

- Buildroot builds the toolchain, which is the cross-compilers and other tools that it needs to compile the target system (green boxes).
- The source code (blue boxes) for each piece of software is downloaded from the Internet.
- Using Buildroot scripts (grey boxes), source is unpacked, patched, configured, compiled, and installed into the target output directory that forms the root filesystem (“rootfs”) for the target (purple boxes).
- Extra files, such as on-device configuration files, also get copied into the target output directory.
- Finally, scripts assemble the final firmware image from this rootfs.
There are some exceptions; sometimes the cross-compiler is downloaded without needing to be compiled. Sometimes the manufacturer ships an entire “Board Support Package” (BSP) where all the compilation has already been done for you. But at the end of the day, those just truncate this flowchart; all the steps still have to be accomplished somehow.
Here are the most important directories in the top of the Buildroot tree. There are others, but they are boring. You’ll spend most of your time interacting with these:
| Directory | Purpose |
|---|---|
| board/ | Files and scripts to support each target board |
| configs/ | Build configurations such as raspberrypi0w_defconfig |
| package/ | Package definitions |
| output/host/ | Build tools that run on the workstation |
| output/target/ | Target output directory where target binaries are staged |
| output/images/ | Filesystem images and the final firmware image are emitted here |
So, the next question is: How does the one magic make command know how to build everything?
To answer that, first I’ll talk about the structure of a Buildroot package.
Buildroot packages
Compilation scripts are grouped into packages. Most things in Buildroot are packages.
You can see these packages under the package directory in the Buildroot tree.
Buildroot 2019.11 ships with 2,289 packages!
This is a wonderful library of free, open source software that you can drop into your custom firmware with a few commands.
Everything from the Nginx web server to the Chocolate Doom game engine is available.
Each package defines its own configuration options, build steps, and dependencies. The dependencies tell Buildroot in what order to build packages, the build steps tell exactly what commands to run to build the package (including how to download its source code), and the configuration options control anything about the package.
The package’s list of configuration options is in a file called Config.in4 using a language called Kconfig5.
At minimum, the package must supply an option controlling whether or not the package is to be compiled at all.
To put the package in the target’s image, you enable this option.
There might also be other options controlling whether extra features of the software are compiled in.
These extra options are often useful when space is at a premium: you can simply “compile out” features that you don’t need.
Armed with an understanding of a package’s configuration, it is easy to understand the entire build configuration.
Build configurations
Taken together, all the configuration options for all a system’s packages form a build configuration. Applying one of these default build configurations—a “defconfig”—allows you to quickly select all the relevant options.
And so this is how make knows how to build everything: all the configuration options, for all the packages, were supplied in the raspberrypi0w_defconfig file that we specified at the beginning of the build.6
(GNU Make calculates the dependency tree and starts building the packages in the correct order.)
Selecting the defconfig copies all the config options into the working configuration kept in a file named .config.
You can change the working configuration using the menuconfig tool.
This provides a graphical interface that lets you find and change various menu options.
Here’s an example, using menuconfig to enable the Chocolate Doom package mentioned above.
Note that .config is not supposed to be kept in Git version control; it’s specific only to a particular working copy.
You can run make savedefconfig to copy the working config back to the defconfig, which is version controlled.
Booting the new image
Enough theory. Let’s boot Linux.
Allow the build process to finish. When it does, you should see some lines that look like this:
INFO: vfat(boot.vfat): adding file 'zImage' as 'zImage' ...
INFO: vfat(boot.vfat): cmd: "MTOOLS_SKIP_CHECK=1 mcopy -bsp -i '/home/georgev/Code/buildroot-mel/output/images/boot.vfat' '/home/georgev/Code/buildroot-mel/output/images/zImage' '::'" (stderr):
INFO: hdimage(sdcard.img): adding partition 'boot' (in MBR) from 'boot.vfat' ...
INFO: hdimage(sdcard.img): adding partition 'rootfs' (in MBR) from 'rootfs.ext4' ...
INFO: hdimage(sdcard.img): writing MBR
These lines indicate that the SD card image (sdcard.img) for the Pi has been generated.
It built the image from the root filesystem in output/target/, which you can inspect:7
~/buildroot$ ls -lh output/target/
total 64K
drwxr-xr-x 2 georgev georgev 4.0K Jan 13 22:01 bin
drwxr-xr-x 4 georgev georgev 4.0K Jan 13 20:48 dev
drwxr-xr-x 5 georgev georgev 4.0K Jan 13 22:01 etc
drwxr-xr-x 3 georgev georgev 4.0K Jan 13 22:01 lib
lrwxrwxrwx 1 georgev georgev    3 Jan 13 21:08 lib32 -> lib
lrwxrwxrwx 1 georgev georgev   11 Jan 13 21:23 linuxrc -> bin/busybox
drwxr-xr-x 2 georgev georgev 4.0K Jan 13 20:48 media
drwxr-xr-x 2 georgev georgev 4.0K Jan 13 20:48 mnt
drwxr-xr-x 2 georgev georgev 4.0K Jan 13 20:48 opt
drwxr-xr-x 2 georgev georgev 4.0K Jan 13 20:48 proc
drwxr-xr-x 2 georgev georgev 4.0K Jan 13 20:48 root
drwxr-xr-x 2 georgev georgev 4.0K Jan 13 20:48 run
drwxr-xr-x 2 georgev georgev 4.0K Jan 13 22:01 sbin
drwxr-xr-x 2 georgev georgev 4.0K Jan 13 20:48 sys
-rw-r--r-- 1 georgev georgev 1.4K Jan 13 21:08 THIS_IS_NOT_YOUR_ROOT_FILESYSTEM
drwxr-xr-x 2 georgev georgev 4.0K Jan 13 20:48 tmp
drwxr-xr-x 6 georgev georgev 4.0K Jan 13 22:01 usr
drwxr-xr-x 3 georgev georgev 4.0K Jan 13 20:48 var
We can verify that the SD card image was emitted by looking in the output/images/ directory:
~/buildroot$ ls -lh output/images/
total 225M
-rw-r--r-- 1 georgev georgev  24K Jan 13 22:01 bcm2708-rpi-zero.dtb
-rw-r--r-- 1 georgev georgev  32M Jan 13 22:01 boot.vfat
-rw-r--r-- 1 georgev georgev 120M Jan 13 22:01 rootfs.ext2
lrwxrwxrwx 1 georgev georgev   11 Jan 13 22:01 rootfs.ext4 -> rootfs.ext2
drwxr-xr-x 3 georgev georgev 4.0K Jan 13 21:28 rpi-firmware
-rw-r--r-- 1 georgev georgev 153M Jan 13 22:01 sdcard.img
-rw-r--r-- 1 georgev georgev 4.8M Jan 13 22:01 zImage
Looks good. Now, let’s burn this image to the Pi’s SD card and start connecting the Pi to the computer.
Optional: start the VM
If you are using a Raspberry Pi, skip ahead to the section where we’ll start getting it ready.
If you instead elected to build for a virtual machine, not a Pi, you can start the VM with a command8:
~/buildroot$ output/host/bin/qemu-system-x86_64 -M pc -kernel output/images/bzImage -drive file=output/images/rootfs.ext2,if=virtio,format=raw -append "rootwait root=/dev/vda" -net nic,model=virtio -net user
The VM boots really quickly. On my workstation it only takes a couple seconds.
Once the VM’s window appears, skip ahead to the “Boot the Firmware” section—it’s the same experience once you start the VM.
Aside: how to use dmesg
Let’s take a quick detour and learn how to work the Linux utility dmesg. It is a small tool that displays the output of the kernel log. This is useful because the kernel prints the names it assigns to devices that you’ve just plugged in. Reading the kernel log will let you know which device name to use for, say, your SD card.
Basic usage is simple; just run:
$ dmesg -w
The -w flag stands for “watch;” dmesg will continue to monitor for new messages after dumping the kernel’s existing log.
You can ignore the existing log; it’s probably pretty verbose.
Once dmesg is watching, you can plug in your gadget and you should see a few lines like this:
[163513.147002] mmc0: new ultra high speed SDR50 SDHC card at address aaaa
[163513.174253] mmcblk0: mmc0:aaaa SP32G 29.7 GiB
[163513.189137]  mmcblk0: p1
In this example, the SD card has been assigned a name of mmcblk0, and it has a single partition p1 (so the full path of the device is /dev/mmcblk0 and its partition is /dev/mmcblk0p1).
Depending on your SD card reader, it might also get assigned an sd prefix. No matter, as long as you know exactly which one it is.
Once you’re done with dmesg, you can just hit Ctrl+C to stop it.
Burn the Raspberry Pi’s SD card
Insert your SD card and use dmesg to learn its block device name.
Use dd to copy the image onto the card. Substitute /dev/mmcblkX with the actual path of your SD card.
~/buildroot$ sudo dd if=output/images/sdcard.img of=/dev/mmcblkX bs=1M status=progress
Note
Be sure you get theof(output file) correct. If you specify your workstation’s hard drive,ddwill happily overwrite all your files. If you’re unsure, just go back to dmesg and reinsert your SD card to double check its device name.
Here’s what this command does:
| Option | Explanation |
|---|---|
if= |
Input File—read from here |
of= |
Output File—write to here |
bs= |
Block Size—write this many bytes at once |
status= |
Show a nice progress bar (sometimes this doesn’t work well) |
Once this finishes, make sure the kernel’s write buffers have been flushed to the card:
~/buildroot$ sync
Once this command returns, you can pull the SD card out and stick it into the Pi. Don’t turn on the Pi yet though (nothing bad will happen, it’s just not ready yet).
Connect to the Pi’s serial console
Now the FT2232 USB/UART device needs to be connected to the Pi’s serial pins. Here’s the Raspberry Pi header pinout:
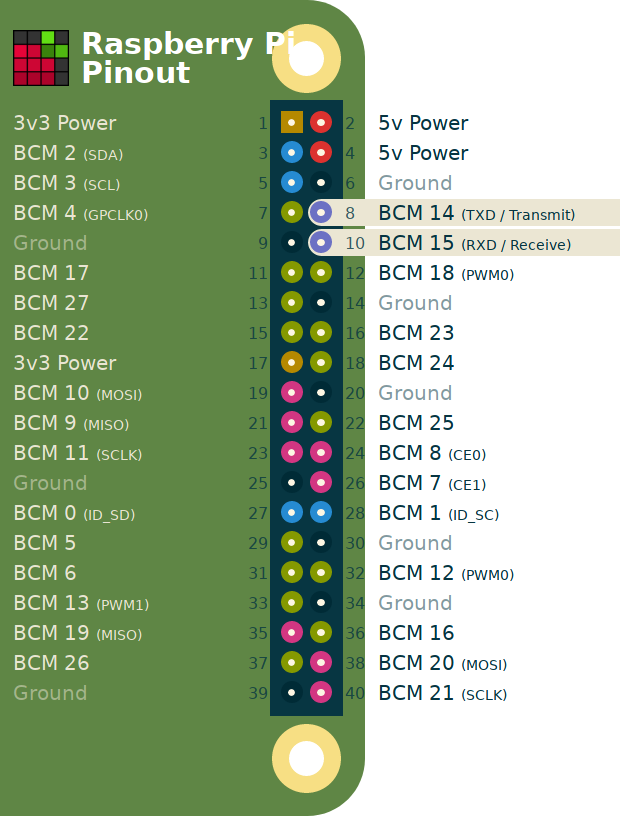
Since the FT2232 isn’t just a UART adapter, we need to know which pins should be used when it is being used in UART mode—the pins are named like ADBUS0, BCBUS3, etc.
To figure this out, refer to section 3.1.2 of the FT2232’s datasheet, which suggests pin mappings:
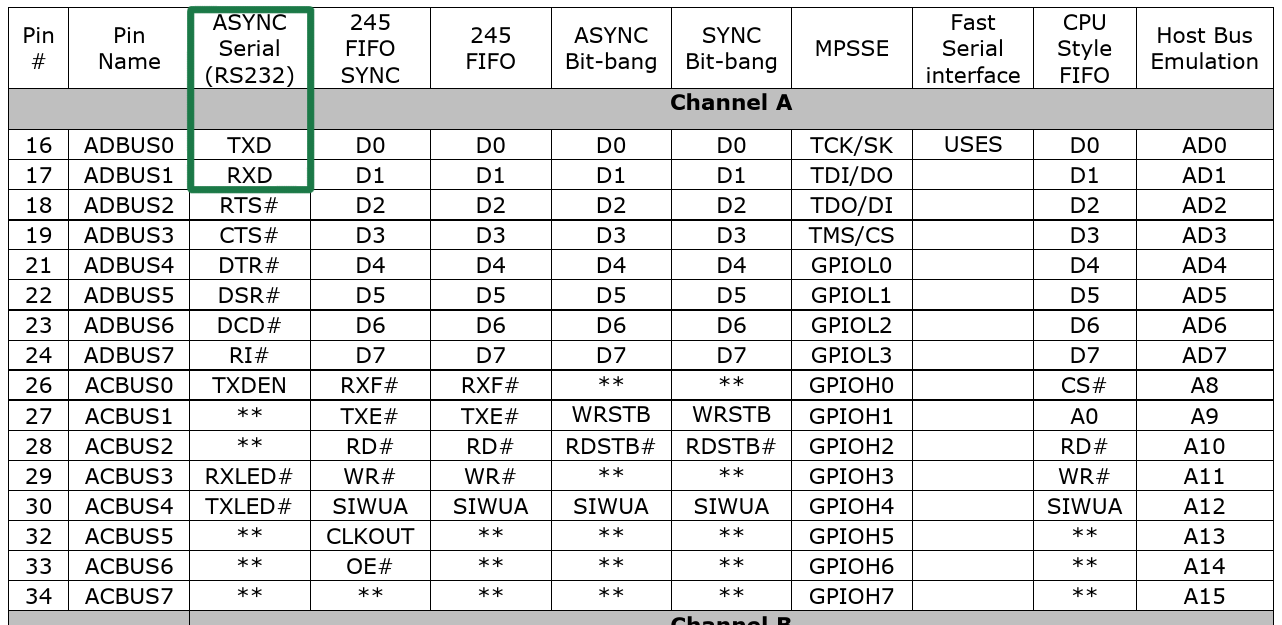
For “Async Serial,” pin ADBUS0 is TXD, and ADBUS1 is RXD. Easy enough.
Connect the Pi’s UART TXD to the FT2232’s RXD, and vice versa. Finally, connect their grounds together. It should look like this:
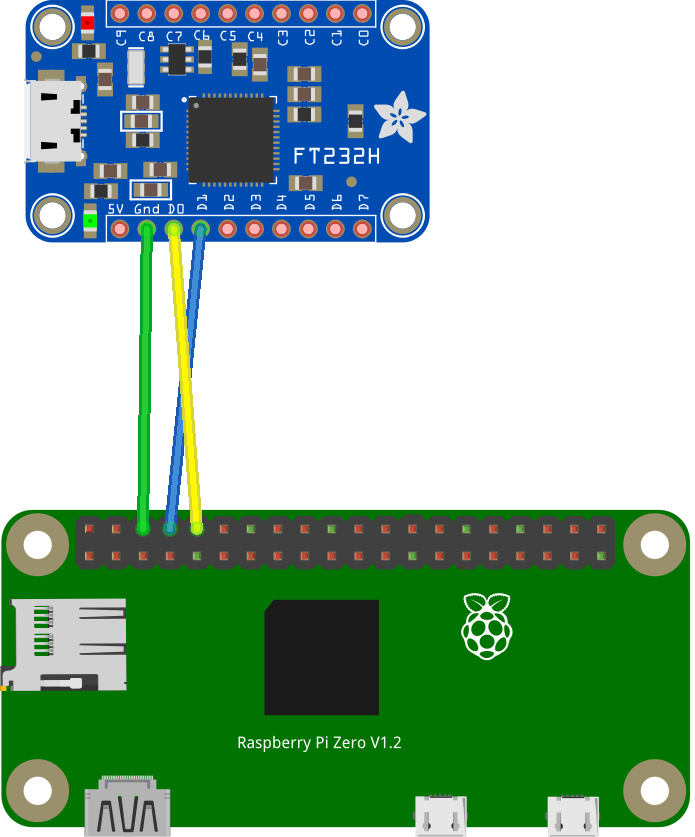
ADBUS0 might be labeled D0 or AD0 depending on your FT2232 adapter. This diagram was made with Fritzing, which is nice for drawing high-level wiring diagrams like these.
Now, plug the serial adapter into your workstation.
Using dmesg, learn the name of your FT2232 as you plug it in. It will probably be named ttyUSB0 and ttyUSB1—these are the two channels.9
Open the serial console
Launch GNU Screen using the device name you just discovered. The extra flags configure the right baud rate and disable flow control—the vast majority of Linux serial consoles use this convention of 115200 baud with no hardware flow control.
~/buildroot$ sudo screen -fn /dev/ttyUSBX 115200
If you want to quit Screen, you need to type the escape sequence Ctrl+a followed by the command \.
Boot the firmware
Plug in the Raspberry Pi’s power adapter. The serial console should begin printing boot messages as the operating system boots:
[    0.000000] Booting Linux on physical CPU 0x0
[    0.000000] Linux version 4.19.66 (georgev@desertvoice) (gcc version 8.3.0 (Buildroot 2019.11.1)) #1 Tue Jan 14 11:14:59 CST 2020
[    0.000000] CPU: ARMv6-compatible processor [410fb767] revision 7 (ARMv7), cr=00c5387d
[    0.000000] CPU: PIPT / VIPT nonaliasing data cache, VIPT nonaliasing instruction cache
[    0.000000] OF: fdt: Machine model: Raspberry Pi Zero Rev 1.3
[    0.000000] Memory policy: Data cache writeback
[    0.000000] cma: Reserved 8 MiB at 0x19000000
[    0.000000] random: get_random_bytes called from start_kernel+0x90/0x4a4 with crng_init=0
[    0.000000] Built 1 zonelists, mobility grouping on.  Total pages: 104545
[    0.000000] Kernel command line: coherent_pool=1M bcm2708_fb.fbwidth=720 bcm2708_fb.fbheight=480 bcm2708_fb.fbswap=1 smsc95xx.macaddr=B8:27:EB:6C:5F:E1 vc_mem.mem_base=0x1ec00000 vc_mem.mem_size=0x20000000  root=/dev/mmcblk0p2 rootwait console=tty1 console=ttyAMA0,115200
[    0.000000] Dentry cache hash table entries: 65536 (order: 6, 262144 bytes)
[    0.000000] Inode-cache hash table entries: 32768 (order: 5, 131072 bytes)
[    0.000000] Memory: 397928K/421888K available (6947K kernel code, 635K rwdata, 2080K rodata, 452K init, 796K bss, 15768K reserved, 8192K cma-reserved)
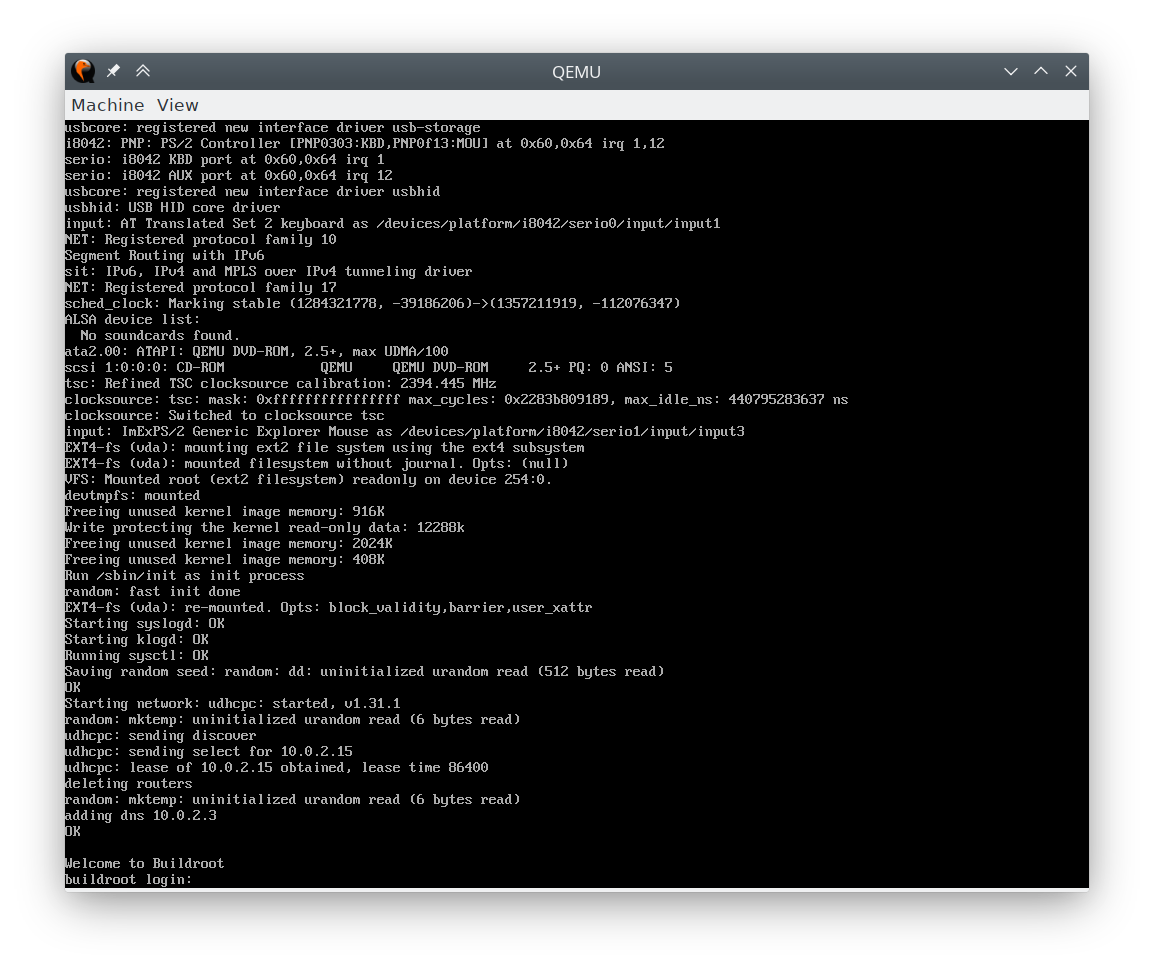
Eventually, it should print a login prompt:
Welcome to Buildroot!
buildroot login:
You can enter root as the username; there isn’t a password.
You can look around with commands like ls /usr/bin to see what programs are available on the image.
If your board made it to the login prompt, congratulations! You have compiled and booted your first firmware image from source code. The world is your oyster.
Key takeaways
This has been a high-level introduction to Buildroot. It’s easy to get much further down in the weeds than this article goes. Nevertheless, it’s definitely a lot of info.
Here’s the key takeaways from this lesson:
- You own all the code on the target and all the tools that make it.
All the software in this process is completely open source. It is all compiled on your computer when you typemake. If anything is broken or doesn’t work like you want, you can simply change it. - All the work was automated.
Buildroot lets you focus on implementing one thing at a time, starting from a working Linux system. Gradually, you can take the defconfigs provided and craft them into custom firmware that works exactly like you want. - The target rootfs is tiny!
The default image is only 57 megabytes, and most of that is kernel modules that you can turn off. Buildroot’s “small image” philosophy leaves you plenty of space to add features, or lets you build a firmware image that fits in as little as 4MiB.
Further reading
A lot of people have emailed me to ask about other reading materials they can get to learn more about embedded Linux systems. I am currently working on building a better list of resources. Here are some of the ones that are most relevant to this chapter:
- How Linux Works, 2nd Edition10 by Brian Ward is a great book about many topics in Linux. It’s relevant for desktop and server Linux, as well as embedded. It covers basics such as shell commands yet still goes into important, complex topics like the X11 window system and the DBus messaging bus. It’s the right amount of detail to give you a good mental picture of how everything works, while still being approachable.
- Bootlin’s Buildroot training is maintained by the very prolific team at Bootlin, a French company that does embedded Linux development. You can pay them to come give your entire team training using this material. If you’re willing to read through their slide deck, it’s very thorough, although there’s no lecture accompanying it.
- The Buildroot user manual is the place to learn about hacking on Buildroot. The various areas of the build system are well-described and the reference manual for writing new packages is superb. The downside is that because it is a user manual, not a tutorial, it’s quite dense. You’ll definitely get familiar with it as you use Buildroot going forward.
If you would like to recommend other relevant embedded Linux learning material, please send me an email as I would be glad to learn about it.
Coming up next
In the next article, we’ll be adding a feature to the Linux system we just compiled.
This will involve reading some documentation and customizing the build configuration with menuconfig, like in the demo I showed earlier.
I’ll also be discussing the init system and how to integrate your programs into the boot process. (Edit: this has been postponed to Part 6.)
We’ll make all the changes and rebuild, testing the new changes right away (rebuilds take only a couple minutes with Buildroot). This is the next step in the iterative process of crafting your own firmware image!
Subscribe to updates
You can subscribe to all of my blog updates via email or RSS on the Subscribe page. Thanks for reading!
Notes
- A note about troubleshooting:
If you are running into problems, I highly recommend that you Google the error message, possibly alongside the keyword “buildroot.” It is likely that someone has had your problem before. At any rate, the world of embedded systems is full of novel bizarre problems, being frustrated is normal, and debugging is a really good skill to build. - A note about using a virtual machine as a workstation:
If you’re building Buildroot inside a VM (e.g. Ubuntu is in VirtualBox, and your PC is actually running Windows), be sure you pass through the FT2232 and the SD card reader to the guest. You should probably also give the guest multiple CPUs, or the build will take a very, very long time.
-
Your definition of “fun” may vary. I think it’s pretty cool, anyway. ↩︎
-
If you intend to use your workstation for other things, you can instead run
nice make, which will make the build a lower priority so that your workstation is still responsive. ↩︎ -
Although this guide uses Buildroot, this workflow applies to any embedded Linux distribution. ↩︎
-
Packages compiled for the host, not the target, have separate options in
Config.host.in. ↩︎ -
Kconfig was originally created by the Linux kernel developers to help manage the Linux kernel’s vast array of features. Buildroot has a similar scope, so Kconfig is useful here too. ↩︎
-
This isn’t actually quite true. In reality, only non-default options are stored in the defconfigs. But since the default is stored elsewhere, it amounts to about the same thing as “storing all the configuration options.” ↩︎
-
Buildroot adds a file called
THIS_IS_NOT_YOUR_ROOT_FILESYSTEMto theoutput/targetdirectory. This is the root filesystem, mostly. But there are a few extra steps that happen, like creation of special files, that aren’t reflected in this tree, so that’s why that warning file is there. ↩︎ -
How did I know this awful command? Simple: I read it in the readme file in
boards/qemu/x86_64/readme.txt. ↩︎ -
If you have an FT232 (not 2232), you’ll only have a single channel. That’s okay; we’re not using the second one right now. ↩︎
-
Some links on my site, such as this one, are affiliate links. The proceeds help me keep buying and building neat embedded systems. ↩︎