
This is the fourth part of the Mastering Embedded Linux series, which is designed to help you become an expert at developing low-cost custom embedded Linux systems. Continuing the ongoing theme of developing customized firmware, I’ll be discussing how to add high-level “features” to your firmware image by taking off-the-shelf open source software, configuring it, and integrating it into your system.
As an example of this workflow, we’ll be taking the Raspberry Pi Zero W firmware, which we built from source code in Part 3, and modifying it to implement a wireless access point. To follow along, you’ll need the hardware list from Part 2.
The method I explain is broadly applicable to any firmware features you might want to add to your custom embedded system. First, I’ll identify the software we intend to use and paint a broad picture of how the new firmware feature will work. Then, we’ll actually implement it in the firmware.
Workflow for new features
The full workflow for a new firmware feature looks like the following checklist. You’ll notice that it isn’t so different from other software engineering activities.
- Plan what the feature looks like to the user and which specific things the system should do. Do you need to handle a new piece of hardware? How does the new feature/subsystem handle errors?
- Select the software you need to accomplish this list of behaviors. You might need to enable new kernel drivers, new daemons, or even write a couple scripts to tie everything together.
- Configure the selected software for your specific use case, since good software is almost certainly more general than your exact vision.
- Test your changes by booting with the new code. Inspect the system. Does it work? If not, debug; lather, rinse, and repeat. If you’re part of a professional engineering team, you might write automated integration tests; if you’re just hacking on the weekend, you might not.1
- Finalize your changes by checking them into source control.
How to implement an access point
The goal is to have the Pi (the “target”) function similarly to a normal Wi-Fi router: on startup, the Pi should automatically create a Wi-Fi access point. It should also automatically assign an IP address to clients using DHCP. This should happen without any user interaction or configuration of the device.2
To accomplish this, this “firmware feature” actually needs two daemons and some additional firmware for the Wi-Fi chip.3 We’ll use the well-respected combination of hostapd and dnsmasq to do the userland work, and install the firmware that’s already packaged.
hostapd is responsible for creating the host access point that other devices can join. It talks to the Wi-Fi API provided by the kernel to set the hardware up as a host; it chooses the Wi-Fi channel and sets the security. Then, it manages all the events and network traffic that are associated with being a host—things like connect/disconnect events. To keep things simple, we’ll just use a simple 2.4GHz open access point.
dnsmasq will assign IP addresses via DHCP. When client devices connect, they expect to be assigned an IP address by the router. Again keeping things simple, we’ll assign an IPv4 address in the 10.33.40.0/24 range (which I have selected from thin air).
The target itself needs to be statically assigned an IP address so that AP clients can route traffic to it; we’ll use 10.33.40.1 for the wlan0 interface.
Our current Buildroot defconfig uses /etc/network/interfaces (not systemd’s networkd), so we’ll have to add a couple lines to that file.
This configuration will be baked into the image, so you can burn the firmware and the system will start up ready to go, with no manual steps needed.
Configuring the software
Let’s go ahead and write the configuration files for these programs. I’ve shamelessly cribbed from other howtos and documentation—this isn’t university!4
# dnsmasq.conf
interface=wlan0

# Serve addresses in 10.33.40.{10-200}, subnet /24, with a 24-hour lease
dhcp-range=10.33.40.10,10.33.40.200,255.255.255.0,24h
# hostapd.conf
interface=wlan0
# Kernel driver; most modern drivers use nl80211
driver=nl80211
# The AP "friendly name"; change to anything you like
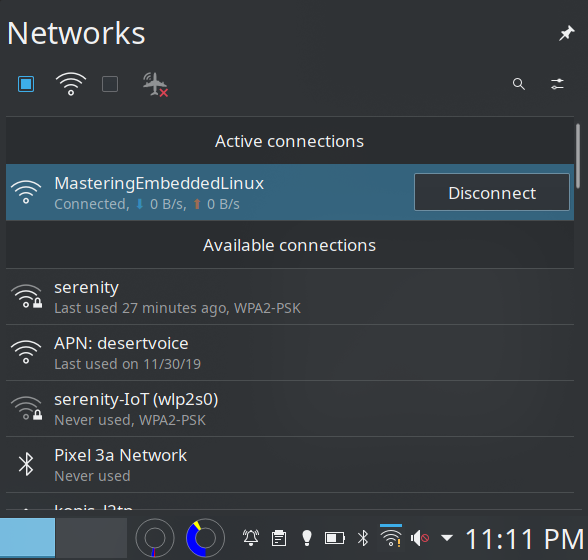
ssid=MasteringEmbeddedLinux
# Use 802.11g, not the glacially-slow b
hw_mode=g
# Arbitrarily choose radio channel from 1, 6, or 11, the only useful 2.4GHz ones
channel=6
Buildroot automatically creates the ifupdown configuration and populates it with a quick configuration to be a DHCP client on eth0.
Since the Pi Zero W doesn’t have an Ethernet port, we’ll just overwrite it with our own:
# /etc/network/interfaces
auto wlan0
iface wlan0 inet static
    address 10.33.40.1
    netmask 255.255.255.0
We are able to write these now because nothing about them is specific to Buildroot.
Note
At this point, you could actually install these programs on your computer from your distribution and use these configuration files to test everything. This is often a viable approach, because you can iterate faster on your workstation than you can on the target. (Similarly, writing and packaging embedded Linux software should be considered separate tasks; developers iterate much faster with their beefy workstations.)
Startup scripts
If you log into the firmware image from Part 3, you might notice that ip link doesn’t mention wlan0.
That’s because the Wi-Fi isn’t set up by the existing Buildroot firmware.
At boot, we’ll need to load the kernel module that serves as the driver for the Wi-Fi chip.5
(Also, for reasons unknown, the Buildroot hostapd package doesn’t include a startup script, so we’ll add one.)
The current Buildroot configuration is using init scripts, which I’ll cover in much more detail in Part 5.
For now, all you need to know is that executable files placed in /etc/init.d/ are started in alphabetical order.
It’s customary to start them with S and a number, to turn alphabetical order into numerical order.
Since we want to load the kernel module first and start hostapd last, we’ll call them S02modules and S90hostapd.
Here’s the module loader. I’m being really lazy here:
#!/bin/sh

/sbin/modprobe brcmfmac
And here’s the hostapd script. (This is mostly copied from existing scripts. They all look alike.)
#!/bin/sh

case "$1" in
        start)
                printf "Starting hostapd: "
                start-stop-daemon -S -x /usr/sbin/hostapd -- -B /etc/hostapd.conf
                [ $? = 0 ] && echo "OK" || echo "FAIL"
                ;;
        stop)
                printf "Stopping hostapd: "
                start-stop-daemon -K -q -x /usr/sbin/hostapd
                [ $? = 0 ] && echo "OK" || echo "FAIL"
                ;;
        restart|reload)
                $0 stop
                $0 start
                ;;
        *)
                echo "Usage: $0 {start|stop|restart}"
                exit 1
esac

exit 0
Porting the configuration to Buildroot
Configuration files like these only make sense in conjunction with a particular board and firmware configuration. They don’t belong in packages, which are hardware-agnostic.
Instead, board-specific configuration files are placed in a directory that Buildroot calls an overlay. Files in such directories are overlaid onto the generated filesystem after all the packages have been compiled. We’ll simply add these configuration files to an overlay, and they’ll appear in the corresponding place in the final image.
Implementing it
Let’s get started. If you’d like to inspect the finished Buildroot repository, review the companion Mastering repository available on GitHub under the part-4 branch.
Side lesson: How to work menuconfig
menuconfig is a terminal UI used to change the working configuration.
You can invoke it by running make menuconfig.
Move up and down with ↑ and ↓, and choose the buttons at the bottom with ← and →.
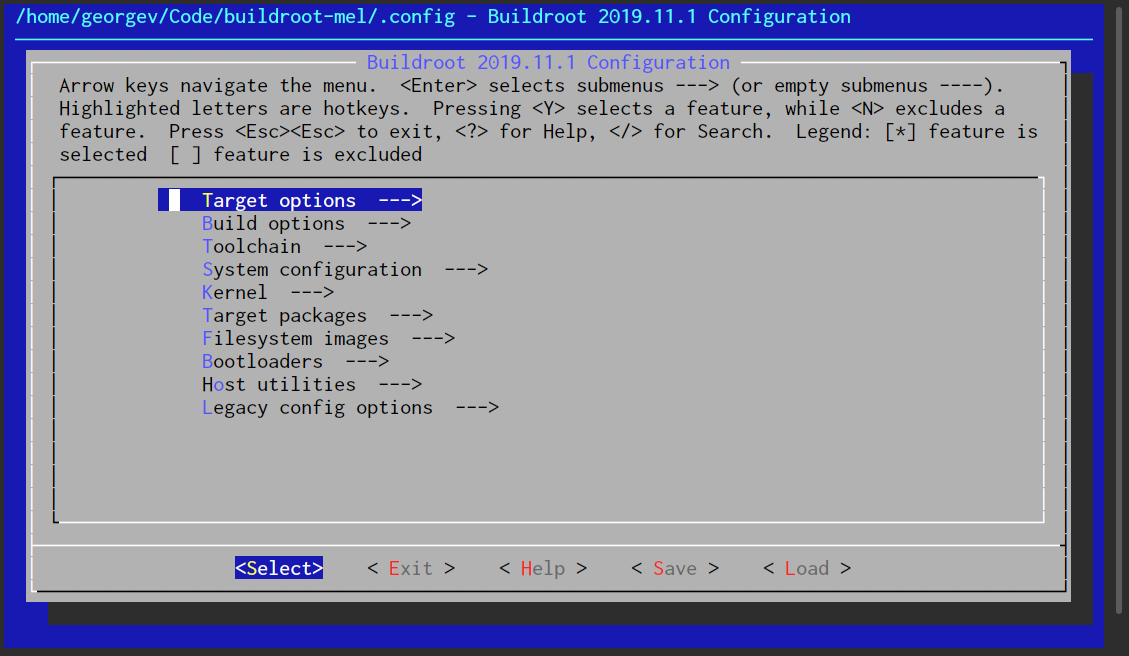
Here’s a quick legend of the various menu item annotations:
-
--->: A submenu. Descend with the<Select>bottom button; ascend with< Exit >. -
[ ]: A checkbox. Toggle with Space. Some things are both checkboxes and submenus. -
***: A comment.
Search is invoked with / (the Vim keybinding for search).
You can search for a program name such as dnsmasq or configuration variable such as BR2_PACKAGE_DNSMASQ.
In the results, menuconfig will display the menu location of the configuration option—in this example, you’d drill to “Target packages” then “Networking applications”.
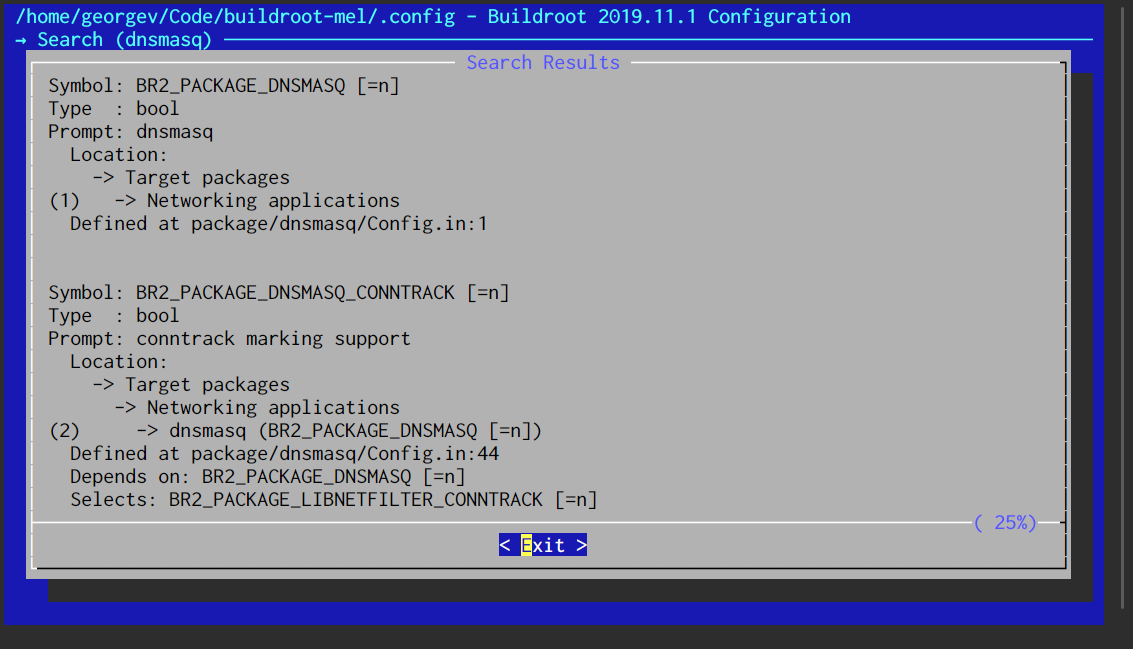
It also displays whether the package is enabled ([=n]) and lists its dependencies.
If you can’t see an option in the menu, it’s because its dependencies aren’t enabled.
Dependencies can sometimes lead to a wild goose chase where you have to go find three recursive dependencies and turn them on before the desired option appears. To mitigate this, dependencies are typically “big ticket” items like a toolchain with C++ support. Smaller dependencies like libraries are “selected” by a package instead, which means they’re automatically enabled when you enable that package.
Enable ccache
One of the things you should probably do first in menuconfig is enable ccache. This is a tool that acts as a “proxy” for the compiler: it caches the output of a given compile command. It is very conservative: if the hash of the compiler, input, or command line arguments changes, ccache treats that as a new compilation and doesn’t hit the cache. But since Buildroot runs the very same commands during rebuild, this is a perfect use case.
For menuconfig practice, turn on ccache by navigating to its option under “Build Options” → “Enable compiler cache”. Enable it with spacebar; save and exit.
Now, subsequent compiles will be captured by ccache.
With a warm cache, a rebuild from scratch takes about 20 minutes on my laptop.
If you want to warm up the cache, you can run make clean && make before you go to sleep for the night.
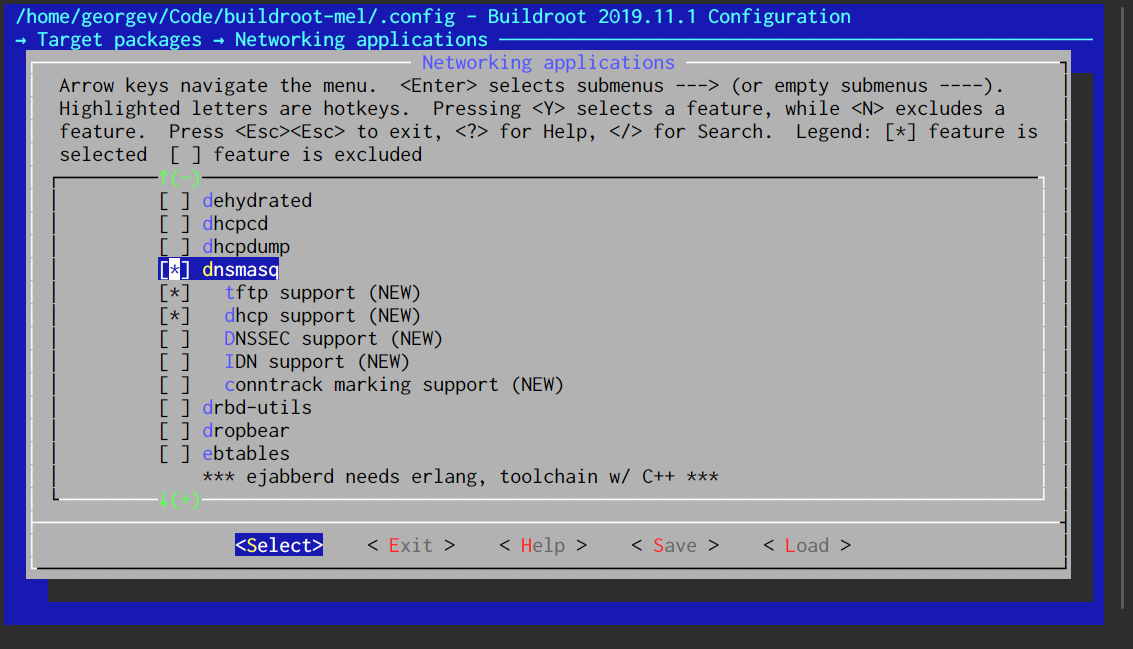
Install the daemons and firmware
Now, we need to enable the applications we need, dnsmasq and hostapd. They are both under “Target packages” → “Networking applications”—but if you’re unsure, remember you can search.
Additionally, the Wi-Fi chip’s firmware needs to be installed; this is a binary blob (always kept in /lib/firmware) that the kernel pushes to the chip when the module is loaded.
Enable the Raspberry Pi Wi-Fi firmware under Target packages → Hardware handling → Firmware (config option BR2_PACKAGE_RPI_WIFI_FIRMWARE).
Note
There are some people that hatevi. (Philistines.) If you’re one of them, you can enable a different editor at this point under “Target packages” → “Text editors and viewers.”
Create the overlay directory
Now we need to create the overlay directory that will add additional configuration files to the target’s firmware image.
Let’s create a directory called board/raspberrypi/rootfs_overlay/, and subdirectories for the actual files.
$ mkdir board/raspberrypi/rootfs_overlay/
$ mkdir board/raspberrypi/rootfs_overlay/etc/
$ mkdir board/raspberrypi/rootfs_overlay/etc/init.d/
$ mkdir board/raspberrypi/rootfs_overlay/etc/network/
Add the five configuration and startup files, given above, to the overlay:
| File | Destination in rootfs_overlay/ |
|---|---|
| dnsmasq config | etc/dnsmasq.conf |
| hostapd config | etc/hostapd.conf |
| ifupdown config | etc/network/interfaces |
| modprobe startup script | etc/init.d/S02modprobe |
| hostapd startup script | etc/init.d/S90hostapd |
Ensure the init scripts are marked executable with the following command. If they aren’t executable, init will emit weird “permission denied” errors during boot.
chmod +x board/raspberrypi/rootfs_overlay/etc/init.d/*
Now, add the new rootfs overlay in menuconfig to the Kconfig option BR2_ROOTFS_OVERLAY; it’s probably empty right now.
This is a space-separated list of individual overlay directories, specified relative to the top of the Buildroot tree.
(No more training wheels; you can find it in menuconfig!)
Recompile the image, flash and burn
Now, recompile by running make; this will build the packages you selected and generate a new image.
Because of the redo logic discussed below, recompiles only take a few minutes.
When it’s finished, inspect output/target/etc/—your new configuration files should be placed!
Side lesson: re-doing things in Buildroot
Once Buildroot builds a particular package’s make subtarget, such as dnsmasq-install-target, it won’t re-do them when you run make again.
If you make changes, such as adding a patch file or changing a configuration option, you need to tell Buildroot to re-do these steps, because they aren’t triggered automatically.
Of course, you could run make clean.
This “nuclear option” is necessary when you make sweeping changes that affect all packages.
Great examples include changing the processor architecture, compiler version, or C library.
It’s also a good idea to run a clean build right before you cut a firmware release, to ensure you haven’t accidentally made manual changes that won’t be captured by a rebuild.
Clean builds are necessary just often enough that using ccache (explained above) is an excellent idea.
However, sometimes you just need to rebuild a single package. If make clean is the nuclear option, then the package’s <package>-dirclean subtarget is a tactical nuke.
This erases output/build/<package>, forcing Buildroot to build the package from scratch on subsequent make invocations.
If you’ve changed build flags for a package, make <package>-dirclean will ensure that those options are captured.
Note, however, that dirclean only erases the build directory for a package, not the files copied into the rootfs in output/target.
There is an important distinction between make subtargets, which do not rerun on every build, and post-build scripts, which do.
These scripts typically do things like assemble the final firmware image.
So if you manually change a file in output/target for testing, a simple make invocation will pick it up into the new image.
Testing
Burn the firmware using the same steps in Part 3. Here’s the relevant command again:
$ sudo dd if=output/images/sdcard.img of=/dev/mmcblkX bs=1M status=progress
In the serial console, you should notice the newly compiled daemons starting up at boot:
Starting dnsmasq: OK
Starting hostapd: OK
And if you look on your workstation or phone, you should be able to see the access point displayed:6
Commit that mess
It works? Great! Keep it that way: check your changes into Git.
In Part 3 I discuss the difference between the working configuration and the saved defconfigs. So far all the changes we’ve made are only in the working configuration, which isn’t supposed to be version controlled. To save the changes back to the defconfig, run:
$ make savedefconfig
Now you can see that the defconfig is modified, and the overlay directory is not yet tracked.
$ git status
HEAD detached at 2019.11.1
Changes not staged for commit:
  (use "git add <file>..." to update what will be committed)
  (use "git restore <file>..." to discard changes in working directory)
    modified:   configs/raspberrypi0w_defconfig

Untracked files:
  (use "git add <file>..." to include in what will be committed)
    board/raspberrypi/rootfs_overlay/

no changes added to commit (use "git add" and/or "git commit -a")
Add and commit the changes with:
$ git add board/raspberrypi/rootfs_overlay/
$ git add configs/
$ git commit -m "rpi: implement simple wireless access point"
How to experiment on the fly
In this article, the software, configuration files, and steps needed to bundle everything up appeared, perfectly formed, out of the head of Zeus, without any messy compile/test/repeat cycle.
I can assure you that when you’re tinkering on the bench, this “works flawlessly first try” scenario might happen once every year or two (when you manage to hit the Ballmer Peak just right).
For all the other times, you will likely need a few attempts before you get everything working just right. The fastest way to quickly iterate is to experiment directly on the target using a half-finished firmware image. You can modify configuration files and test the system manually via the serial console.
When you get a config file polished, copy it back to your Buildroot overlay. If you need a new program during testing, you’ll have to rebuild the image, and burning the image erases your progress if you don’t copy things off the target. Remember, Buildroot’s power is in the reproducibility of the firmware image; monkeying with it after it’s created removes that advantage.
Key points
- This cycle of plan, select, configure, test, finalize is the backbone of embedded system customization. If you need to test or experiment “on the fly,” you can do that too—just be sure to migrate your changes back to Buildroot.
- Although this is engineering, nobody wrote any code during this session.7 Much of embedded Linux engineering is taking finished software packages and packaging them into a working, preconfigured system.
ccachedrastically lowers your rebuild times, which is good because you need to rebuild fairly often.- The rootfs overlay is where board-specific customization goes. It’s best for configuration files and other stuff that doesn’t belong in a package’s scripts.
- All the changes we made have been automated and captured in the Buildroot tree, and the history of changes is visible in Git.
You can reproduce another copy of the firmware image by simply running
make.
Recommended reading
- The Buildroot user manual’s “redo” sections gives guidance about how to cleanly redo build steps.
- The accompanying Buildroot repo for this series has all the changes described above in one convenient place for you to review.
Coming up next
The next installment is Part 5: Packaging Custom Software Part 5: Platform Daemons.
Note
The packaging discussion has been delayed to part 6 because the combined article was getting unwieldy.
We’ll build on the ideas in this article and extend them to do three things:
- Write a quick-n-dirty embedded webserver that knows how to toggle GPIO pins
- Package this new, custom software for Buildroot, including automatic startup at boot
- Add it to our image, just like we did here.
Learning the skill of porting your software to embedded Linux lets you build truly customized Linux firmware that does exactly what you want.
I’ll close by reiterating a point I made in the last article: you own all the code on this system. If something doesn’t work, or you want a new feature in any of the software, you don’t have to wait for the distribution. You are the distribution, and you can make it happen.
Subscribe
You can subscribe to my blog via no-spam email or RSS. Thanks for reading!
-
Automated unit tests involving hardware are hard. If you’re familiar with software testing, imagine that every executable, test harness, and dataset is now a physical object at least the size of a box of playing cards. You can’t create new test fixtures with quite the same wily abandon—you must design a physical test harness that has complete control of the embedded system. ↩︎
-
This philosophy of “no setup needed” is what separates this approach from the many “make your Raspberry Pi do X” tutorials that are available. In this article, the entire functionality of the system is reproducibly captured in the source code and the target configuration, not on one random SD card that is set up just so. ↩︎
-
This is the quick, glossy explanation of access points. There are many other good tutorials that go into greater depth about Wi-Fi, hostapd, and DHCP. The point of this article is to explain how to add features to your embedded systems, not Wi-Fi in particular. ↩︎
-
Thanks to this Raspberry Pi article for the configuration scripts, which I adapted and commented. ↩︎
-
If you enable a couple dependencies, you can use
eudev(under the System Configuration menuconfig option) which will automatically handle loading the correct kernel modules. For now, I’ll stick with an explicit load because it’s also a chance to explain init scripts. ↩︎ -
You may have trouble connecting to it with Android, which implements a “connectivity check” that makes sure the access point has Internet access before it starts routing traffic. (iOS may do something similar; I don’t use iOS to know.) Certainly, your workstation should be able to connect without problems. ↩︎
-
We do write configuration files, but those don’t count. You’ll find that the more configurable the software is, the less you have to modify its source to get it to do what you want. ↩︎