
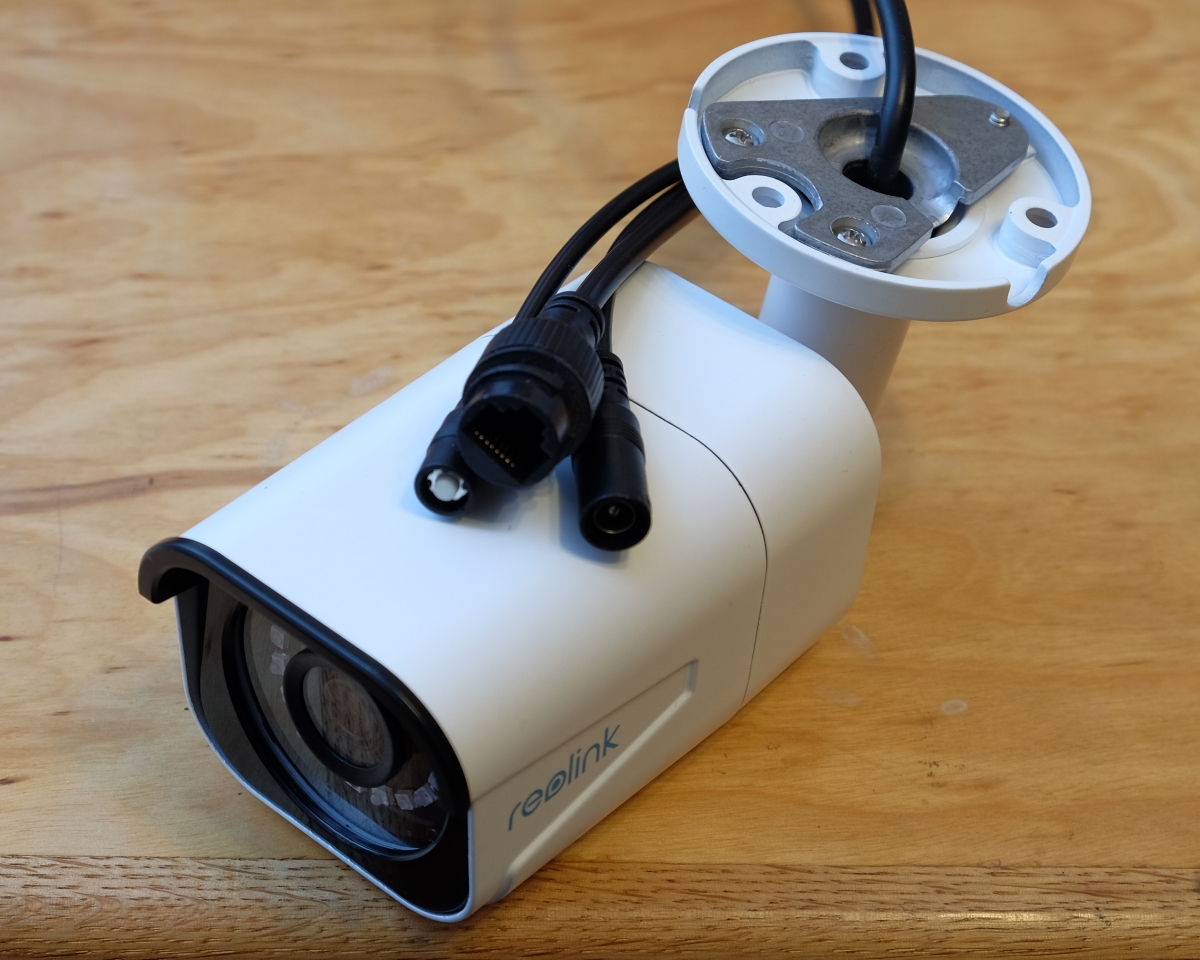
Way back in late 2019, I dissected a Reolink B800 IP camera to demonstrate the various parts of an embedded Linux system. It’s fairly nice hardware, actually—it has a 4K video sensor, a microphone, power over Ethernet, and is nominally waterproof. And yes, it runs Linux.
It came in a “kit” of six cameras and an NVR (a dedicated recording box that also powers the cameras). Unfortunately, the NVR is pretty anemic: it’s clearly an existing model with slight changes to support 4K cameras, and it struggles to support more than one viewer at a time.
However, I bought these cameras because I believed they supported open standards such as ONVIF, so I’d just swap the NVR for a copy of Blue Iris running on my server. At the time, the Reolink support page clearly indicated that all of their non-battery-powered cameras supported RTSP. After the system was installed, it became apparent that the cameras did not in fact support RTSP—the only port open on them was port 9000. Then, barely outside my return window, Reolink updated their support page to say that the cameras would only work with their 8-channel NVR or proprietary viewer apps.
This was, in the immortal words of Bill and Ted, bogus. Heinous. Most non-triumphant.
Bogus enough that I decided to pwn the camera, reverse engineer the protocol, and write my own software to get the video stream. The end result is a new piece of open-source software called Neolink, which allows Blue Iris, Shinobi, or other NVR software to receive video from unmodified Reolink cameras.
Here’s how I did it.
Sniffing traffic
As a first step, I fired up Wireshark and captured traffic between the camera and its official Reolink PC client1.
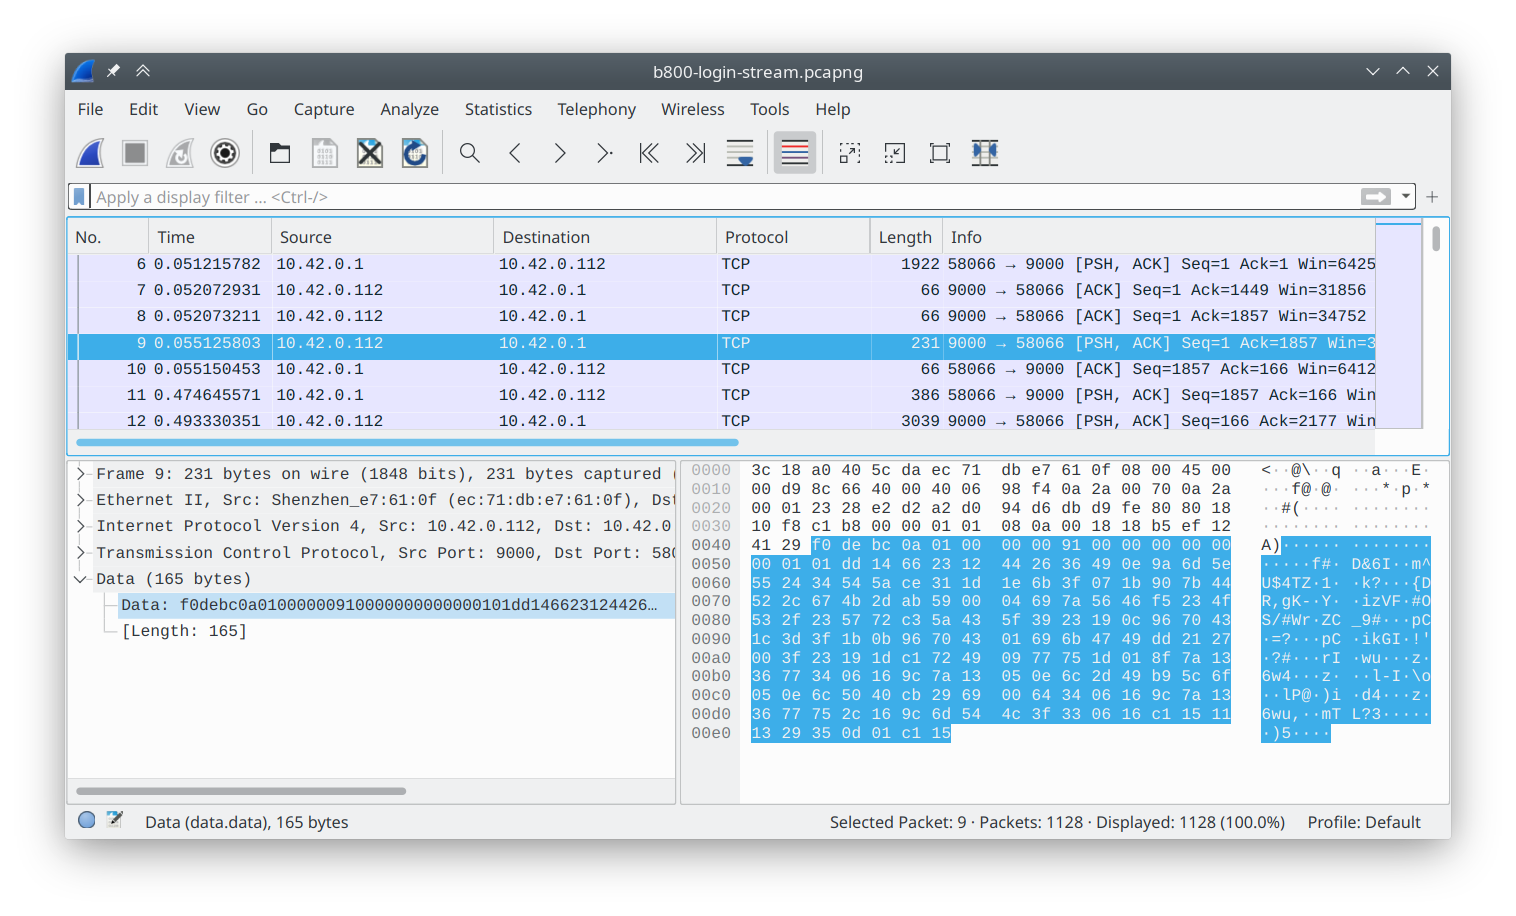
The only thing that jumped out to me was the appearance of a sync word at the beginning of each packet, 0xf0debc0a.
(In little endian, this is 0x0abcdef0.)
On a lark, I Googled this, and actually found a project on GitHub from 2015 which was attempting to retrieve data from Swann cameras!
A quick look at the code told me that although they share the sync word and packet header, the protocols for my camera and these older cameras were very different.
The payload appeared to be encrypted in my captures.
Furthermore, the code wouldn’t even run due to some questionable pointer juggling.
Time to extract what I could—the header layout was correct—and move on.
Dissecting traffic with Wireshark
Always, always spend time developing debug or analysis tools. In my experience, such tools immediately pay back your time investment by a factor of 4 or more. With what I knew, I was able to write a “Baichuan” protocol dissector for Wireshark using Mika’s awesome tutorial. This was easy and fun: Wireshark lets you write dissectors in Lua (disclaimer: your definition of fun may vary). Now Wireshark could show me the payload lengths and message IDs. Not much, but it was a start.
Inspecting the firmware
In order to figure out whatever encryption and/or obfuscation the protocol was using, I planned to reverse engineer the firmware. I felt pretty confident that the underlying video was using a well-known protocol (especially since the camera seemed to have dedicated video encoding hardware). So “all” I’d have to do is reverse engineer the rest of the protocol.
Easy peasy, right?
Why doesn’t this camera support RTSP?
As a quick aside, it’s natural to wonder why this camera doesn’t support RTSP and/or ONVIF. After all, plenty of other Reolink cameras do. Because I’d like to give them the benefit of the doubt, I’ll propose the possibility that Reolink ran out of storage on this camera and had to axe some features.
After all, a 16MB flash chip would cost a whole 20 cents extra. This is just a cost-saving measure and definitely not vendor lock-in, hmmm?
Pwning the camera
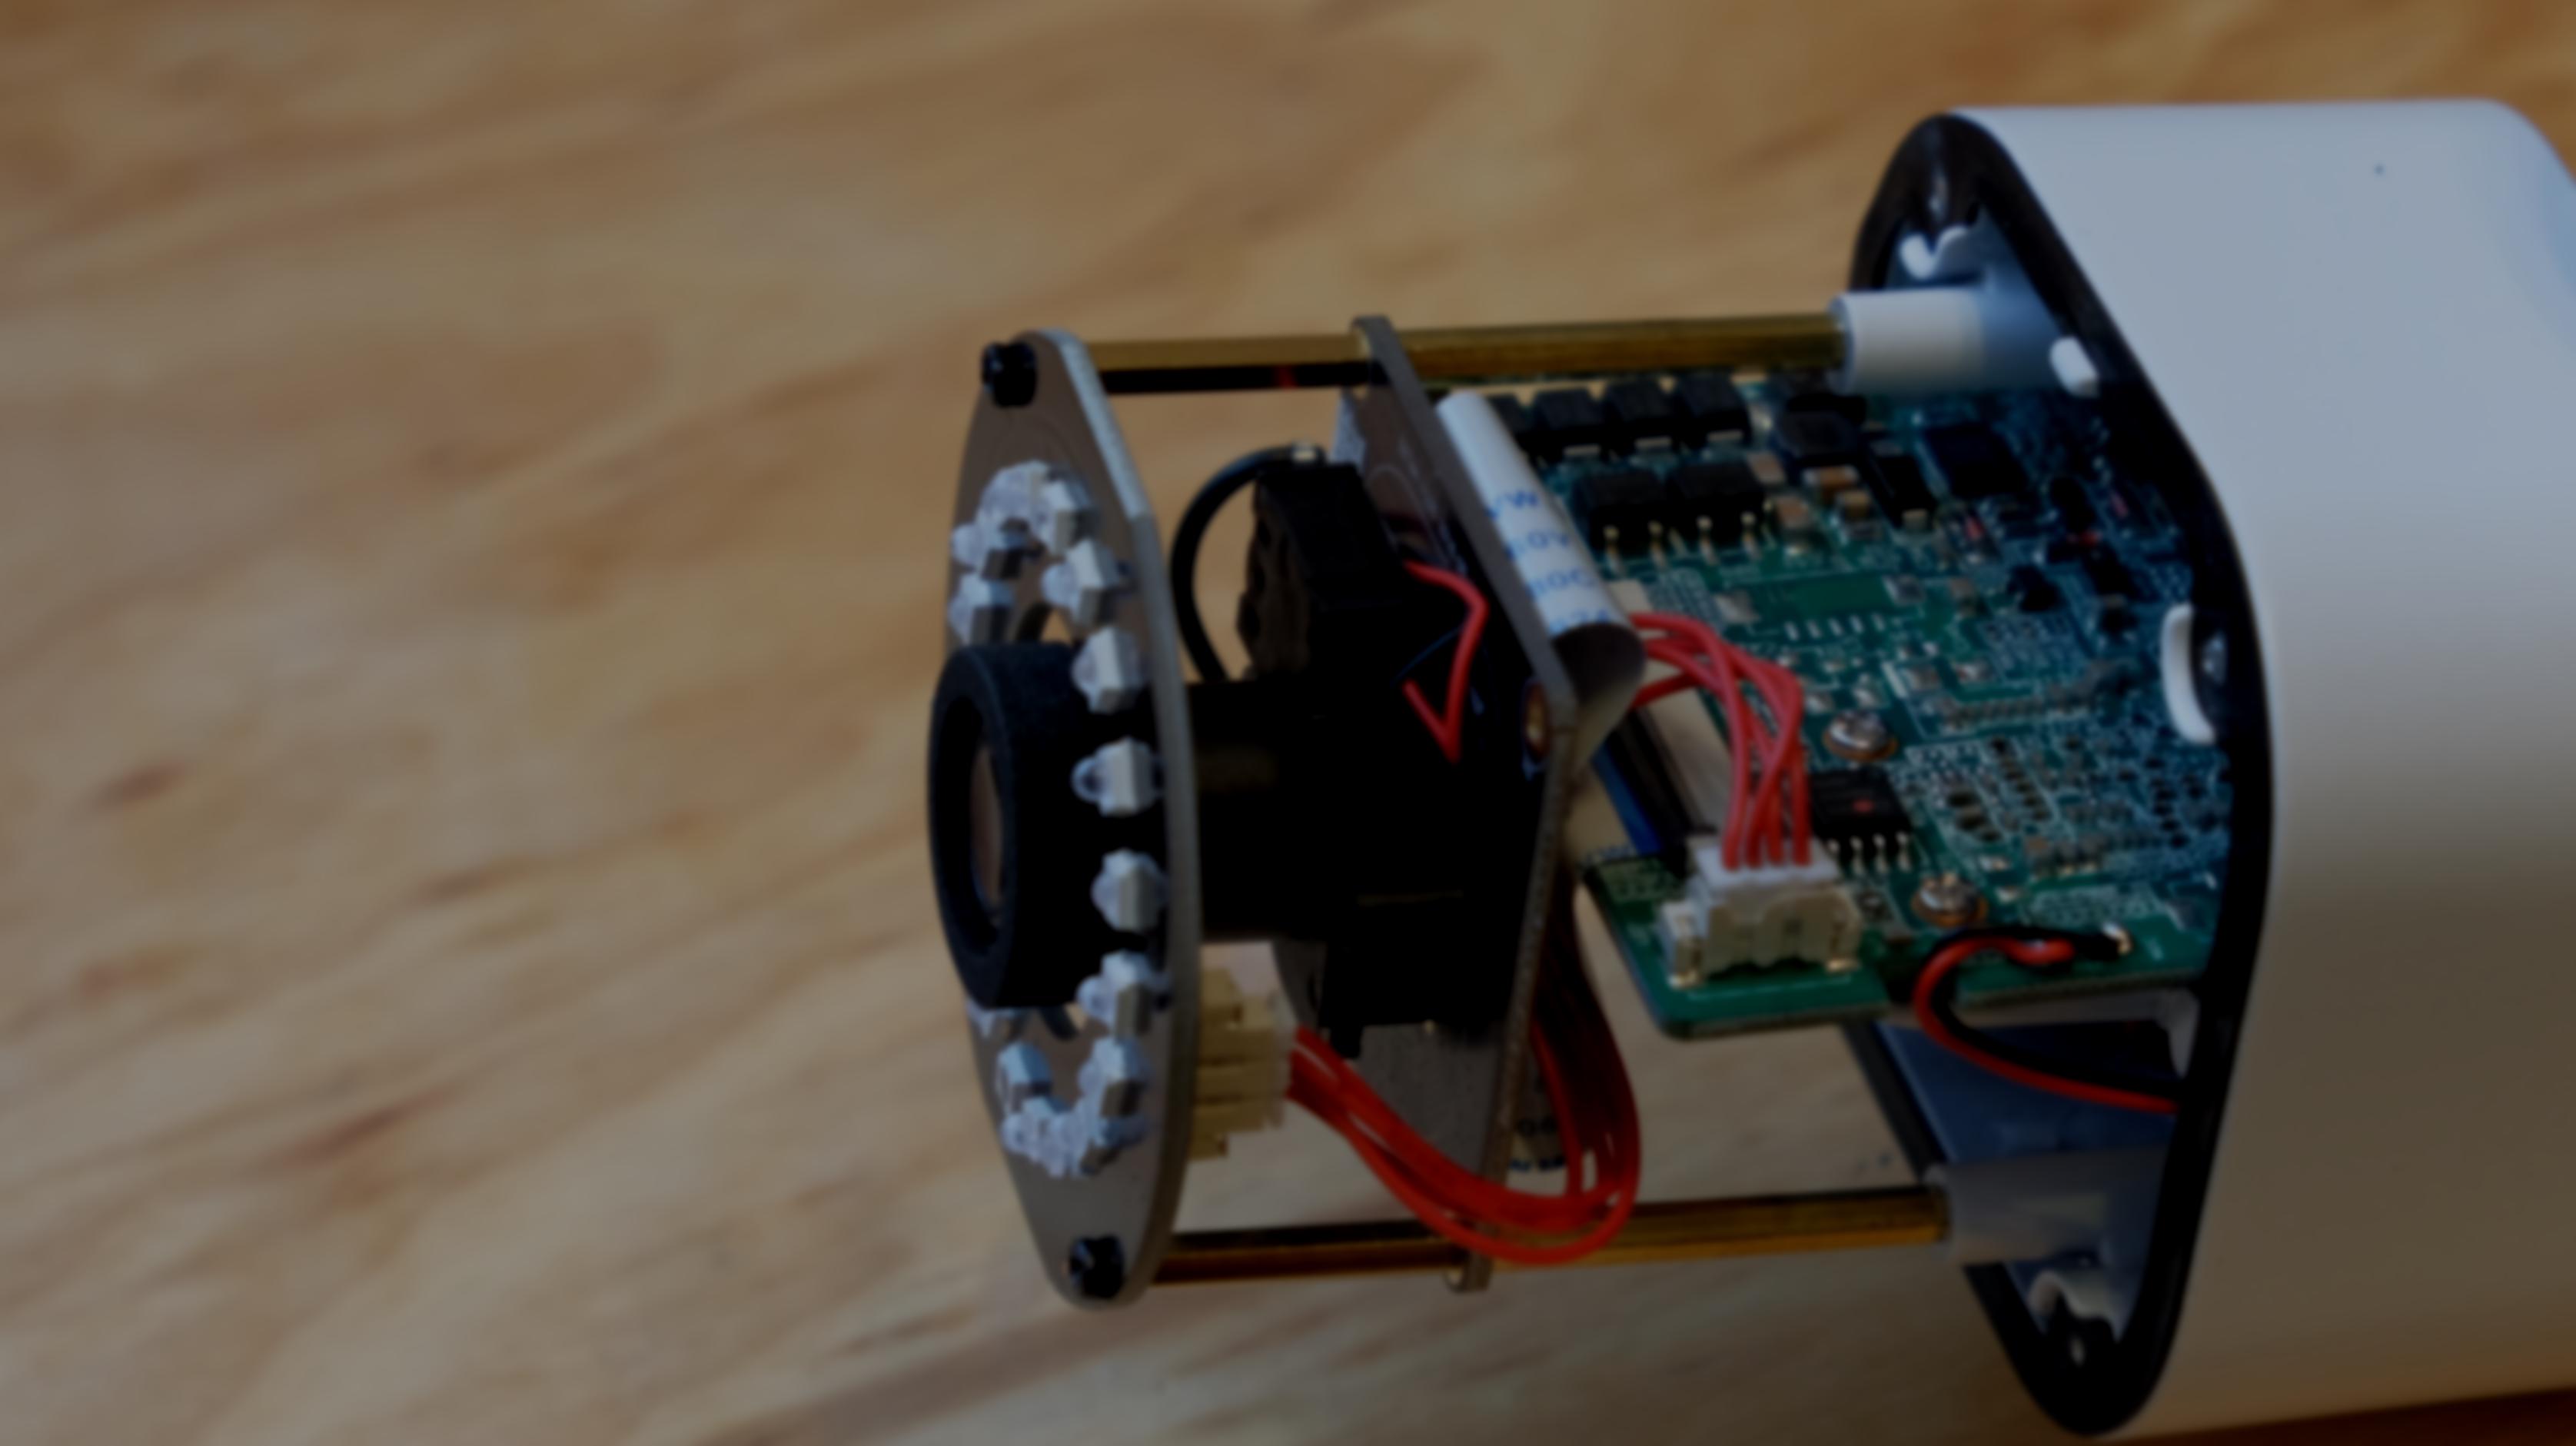
Right, onward. With the protocol not immediately accessible, it was time to crack this camera open. My previous disassembly of the camera has already indicated that it uses SPI NOR flash—bog standard for a small Linux system like this. I was wanting to try out a really neat little SOIC socket I had discovered and ordered on Taobao a little while back. I desoldered the flash and soldered on a socket instead.
The camera was now pwned, permanently—there was nothing I could do to brick it (I could always just reflash it with flashrom) and there was nothing Reolink could do to stop me from running my own code on it (since I had control of the first instruction executed, if need be2).
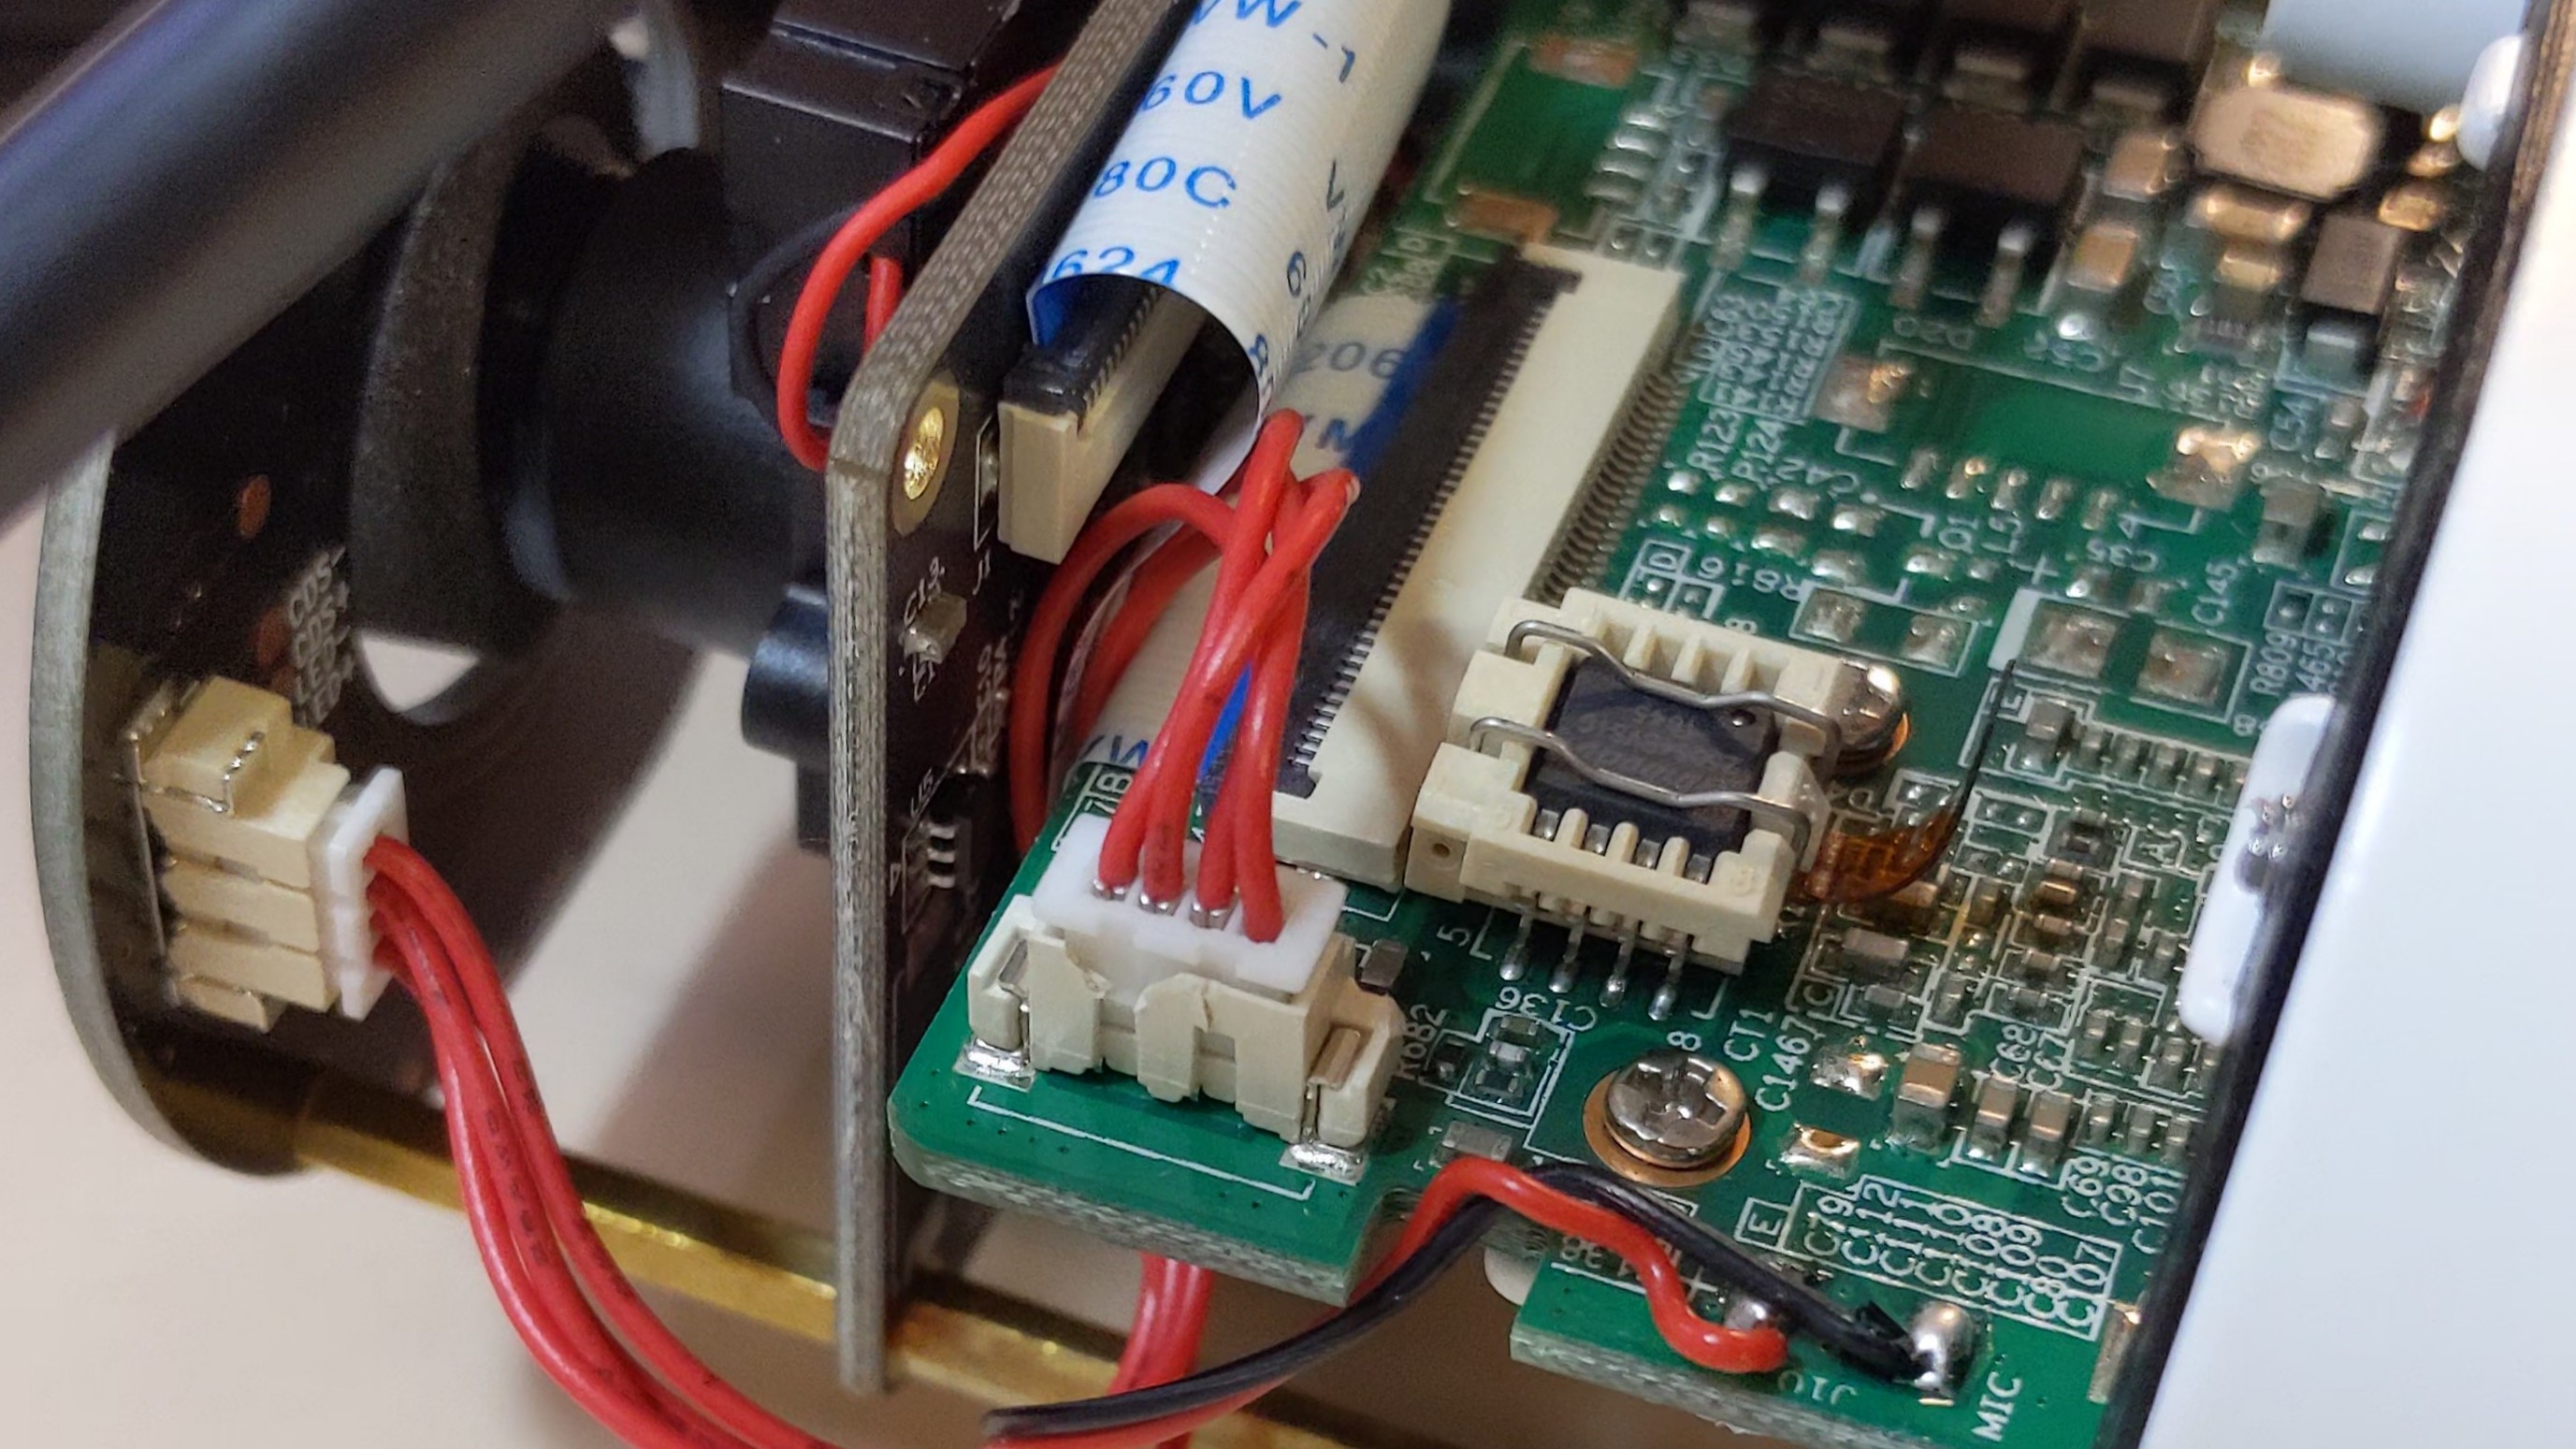
With the flash now conveniently socketed, I dumped it and used binwalk to inspect the layout.
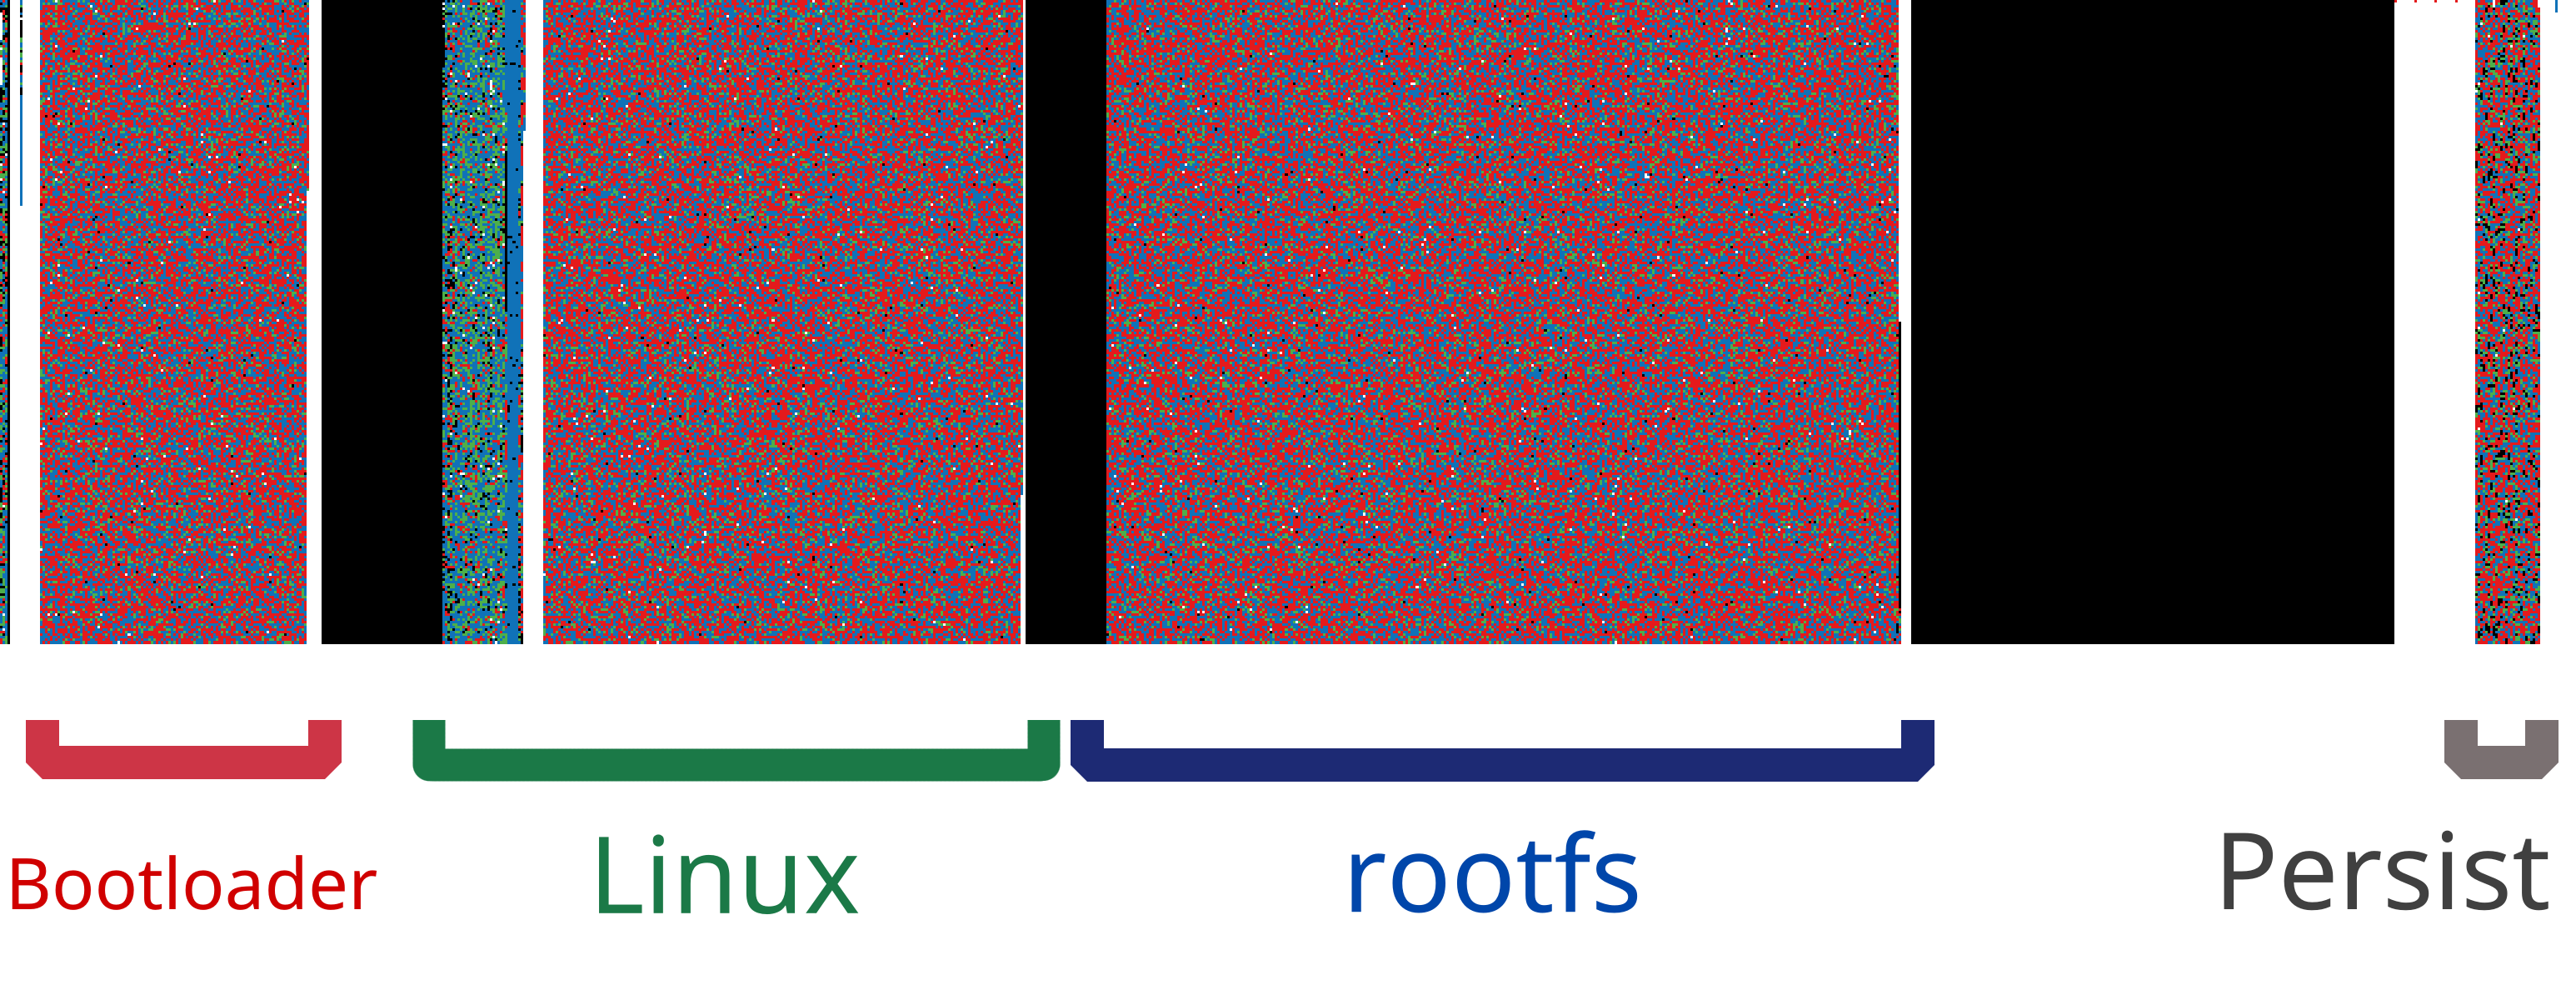
Here’s the flash layout—the nice round byte offsets that engineers tend to pick.3
Bootloader, Linux uImage, squashfs rootfs, and JFFS2 persistent partition.
DECIMAL       HEXADECIMAL     DESCRIPTION
--------------------------------------------------------------------------------
67266         0x106C2         eCos RTOS string reference
1769472       0x1B0000        uImage header
3604480       0x370000        Squashfs filesystem, little endian
7798784       0x770000        JFFS2 filesystem, little endian
This also lines up nicely with this visualization of the flash image, made by a neat little tool called BinVis.
binwalk also conveniently offers to unpack the filesystems it finds.
Low hanging fruit first
My first order of business was to find the actual camera binary.
It was pretty easy to find; it’s sitting in its own directory at /mnt/app/dvr.
The dvr binary also had an accompanying dvr.xml, which looked like a configuration file.
A little grepping later, and… sure enough, here were the magic words ONVIF and RTSP!
# ....
push_server="pushx.reolink.com"
push_server_port="9501"
support_3gnet="0"
support_intelligence="0"
support_smartsearch="0"
support_onvif="0"
support_rtsp="0"
support_bc="1"
support_3dnr_config_interface="1"
default_3dnr_config="1"
# ....
I suspected these were simply feature flags dictating to the software which features to enable. What if I just changed these zeros to ones?

Rebuilding the rootfs wasn’t quite as easy as extracting it, but I cobbled together a command through trial and error. I wanted to get the squashfs format exactly the same as the one reported by binwalk, so that I could be sure that the stock kernel would mount it. Since I was mostly flying blind without a UART console, I didn’t want any trouble.
$ mksquashfs new-squashfs-root/ new-squashfs.img -comp xz -b 262144 -all-root -noappend
$ dd if=new-squashfs.img of=pwned.bin bs=1 seek=$((0x370000)) conv=notrunc
$ flashrom -p ft2232_spi:type=2232H,port=A -w pwned.bin
Alas, it was not to be this easy. The camera exhibited a remarkable lack of behavioral reform: no new ports opened, nothing.
For comparison, I downloaded and unpacked a firmware update for a different Reolink camera that did support RTSP.
The dvr binary for that camera was nearly 8 megabytes, while my victim’s was only a little over 3.
Clearly, the engineers compiled out the unneeded bits.
Getting root
Fine. If Reolink has compiled the extra functionality out, then the least the camera could do is give me a shell. While I was here, I decided I’d make some, ahem, extra modifications.
A quick Google did not yield prebuilt binaries of the tools I was looking for.
Instead, I checked out a fresh copy of Buildroot and quickly set it up for a baseline MIPS configuration with static linking, then asked for copies of gdbserver, busybox with all the fixin’s, and strace:
$ make qemu_mips32r2el_malta_defconfig
$ make menuconfig  # (with appropriate edits made)
$ make busybox gdb strace
Thirty minutes later, I had my tools.
In the rootfs tree that binwalk had extracted, there’s the usual assortment of startup scripts in /etc/init.d.
With my tricked-out Busybox copied to /bin, and a symlink created named telnetd, I added an extra line to one of the startup scripts:
# Get a shell
/bin/telnetd -l /bin/sh
Fingers crossed, I reinstalled the flash and powered the camera.
$ telnet 192.168.1.187
Trying 192.168.1.187...
Connected to 192.168.1.187.
Escape character is '^]'.

/mnt/app #
Mwahahaha.

Reversing the protocol
What to do with my newfound power? I planned to start with a static analysis of the firmware, first reverse engineering the encryption scheme. If I got stuck, I could interrogate the camera binary as it executed.
Once I could undo the encryption, I’d be able to see what the actual protocol was like.
Static analysis with Ghidra
The traditional hobbyist tool for static analysis, IDA free edition, is no good here, because my binary is for MIPS, which the free IDA refuses to disassemble. Instead, the tool of choice is Ghidra, an astoundingly good open-source reverse engineering suite released by the NSA. Now, normally saying “I ran a binary the NSA gave me” will get you laughed out of the room. But Ghidra has been open source for a while now, so I feel reasonably safe installing it from the Arch Linux repository.
If this website looks like it’s made by a government agency, it’s because it is.
Ghidra is awesome. Seriously, this is a piece of software you’d have to pay $10000 for, and it should be your go-to for reverse engineering work. In addition to the disassembler and analyzer, Ghidra also includes a decompiler, which prints pseudo-C code instead of leaving you digging through MIPS assembly. It also re-analyzes in realtime as you annotate function arguments with type information and names. These features easily cut my time spent reverse engineering in half.
So, armed with Ghidra and a false sense of confidence stemming from never having done any reverse engineering before, I went spelunking in the Baichuan binaries.
Strings: a bounty of information
There’s a reason most reverse engineers start by examining the strings in an unknown binary—it’s a technique that works. In my case, checking for strings in the desktop client and the firmware’s server yielded debug print statements, function names (which Ghidra automatically annotated), and a couple other oddball strings that I’ll talk about in a minute. Both codebases were clearly built around a shared proprietary “BCSDK” library.
Searching for crypt yielded a couple of candidate functions that purported to perform encryption:
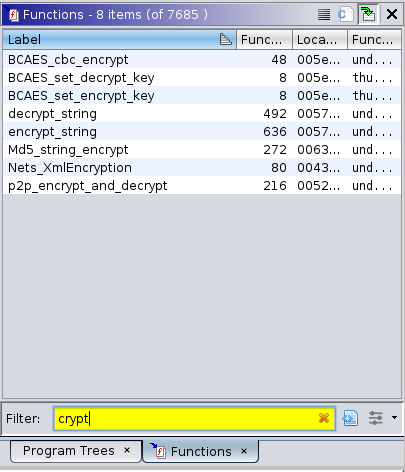
Well, no RSA here, or anything resembling “real” encryption, except AES. (And I could find any AES keys embedded in the app in short order.)
But what’s this string stuck nonchalantly in the middle of the others?

That’s not a function name. I hit find-references and read the code that uses it.
The Charlie Scrambler
Ghidra took me to this gem of a function:
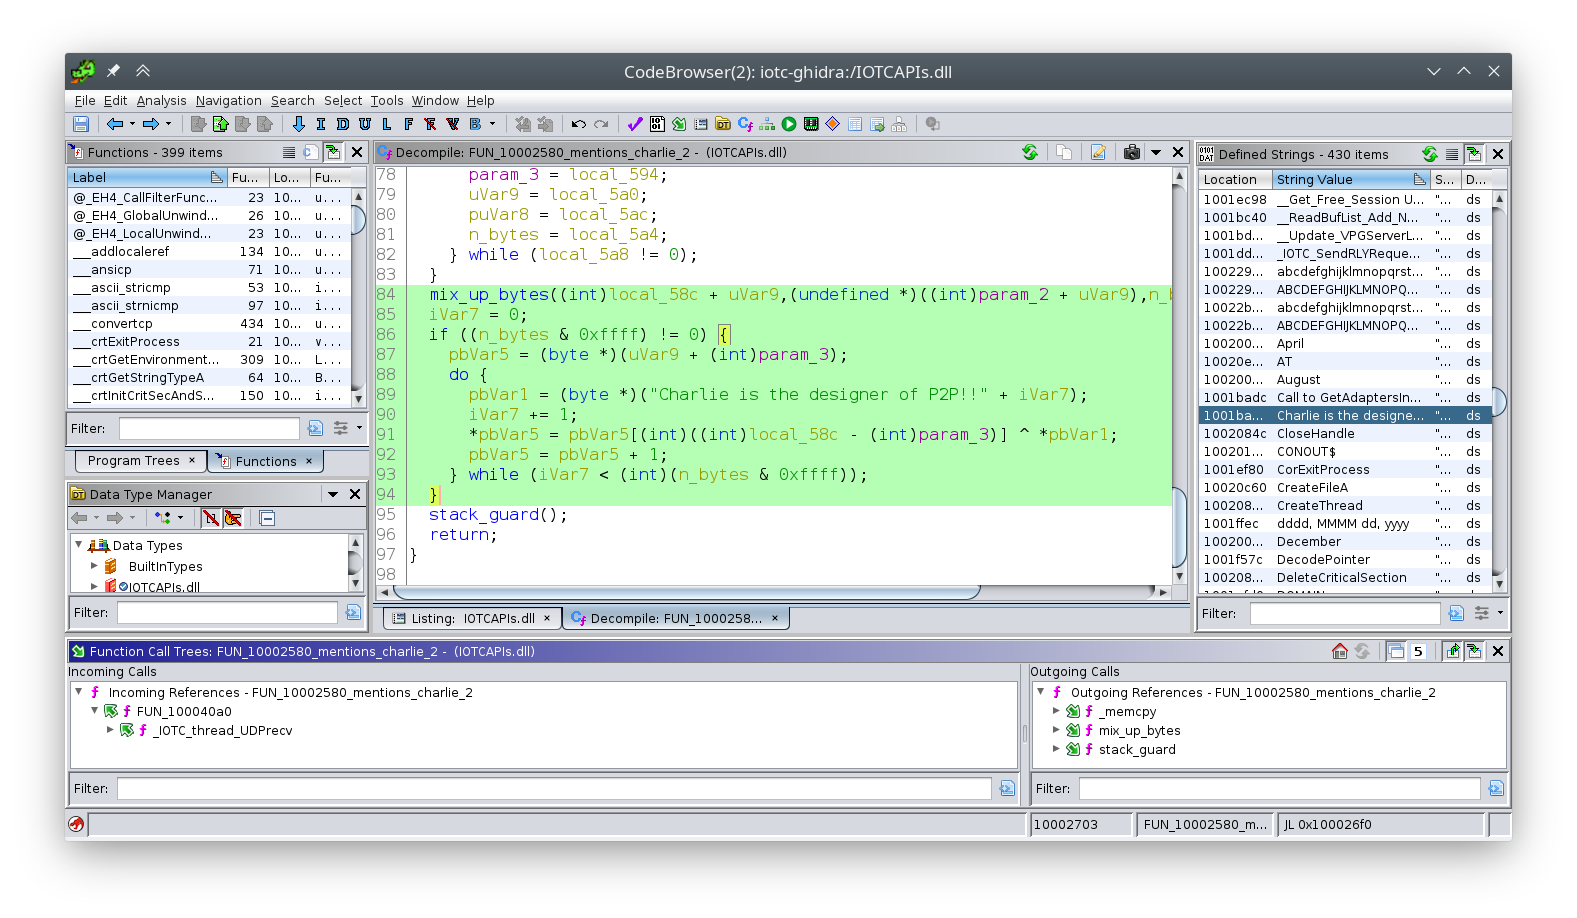
Technically, this is the decryption function; there’s another one that works in reverse.
It only takes a second to understand what’s going on here: the “encryption” scheme is simply:
- XOR the data with the string
Charlie is the designer of P2P!!, then - mix up the bytes.
This isn’t encryption. This is just a scrambler.
Bravo, Charlie, your “design” is permanently encoded in this protocol for all time. Don’t roll your own crypto, kids.
Unfortunately, the Charlie Scrambler is only called from UDP functions (see the cross-reference at the bottom of the Ghidra window). This meant it wasn’t my pigeon; my camera uses TCP. At this point I had no idea which of the other “encryption” functions were the right one for my camera, so it was time to bring out my next weapon.
Dynamic analysis with gdb
With my shell access waiting, my next move was to attach a debugger and control the dvr program remotely from my workstation using my cross-compiled gdbserver and strace tools.
My Busybox included an FTP server and a TCP wrapper:
$ /bin/busybox tcpsvd -vE 0.0.0.0 21 ftpd / -w -A
tcpsvd: listening on 0.0.0.0:21
With this setup I could push whatever tools I wanted to the camera filesystem, even though I hadn’t packed them into the firmware.
I went through this process manually about twice before it became really tedious.
This is the kind of thing it’s possible to automate with expect, a Tcl (!) program that pretends to be a console user.
I scripted these interactions, which reduced the connect, tool push, and gdb setup to a simple:
$ ./start-debug.exp
An added benefit of this setup is that I could stick whatever gdb commands I wanted to run at startup at the end of the script, instead of writing a dedicated GDB script. These dynamic printf commands simply print in the GDB console when the camera hits a breakpoint, helpful for knowing which functions are being called without halting the camera:
send_gdb "dprintf *0x478908, \"_Nets_Without_Password_Login_V20\\n\""
send_gdb "dprintf *0x4780ac, \"FUN_004780ac\\n\""
send_gdb "dprintf *0x6310f0, \"Md5_string_encrypt\\n\""
Feeding the watchdog
After attaching and halting the dvr daemon, the camera promptly crashed and reset.
After some quick investigation, the camera had a watchdog enabled at /dev/watchdog—a very common setup for embedded devices.
I was doing open heart surgery on this software—I didn’t need some two-bit peripheral wandering by and hitting it with an AED!
Busybox ships with a watchdog minder, so I simply fired it up:
$ watchdog /dev/watchdog
Problem solved.
Charlie strikes again
After my breakpoint was hit, I knew which encryption function I was dealing with: Nets_XmlEncryption.
This was immediately good news, because after figuring out the encryption, I was likely dealing with nice ordinary XML, not some crazy half-baked bag of C structs.
I took a look at the decompiled function in question in Ghidra, annotating as I went. Sure did look familiar…
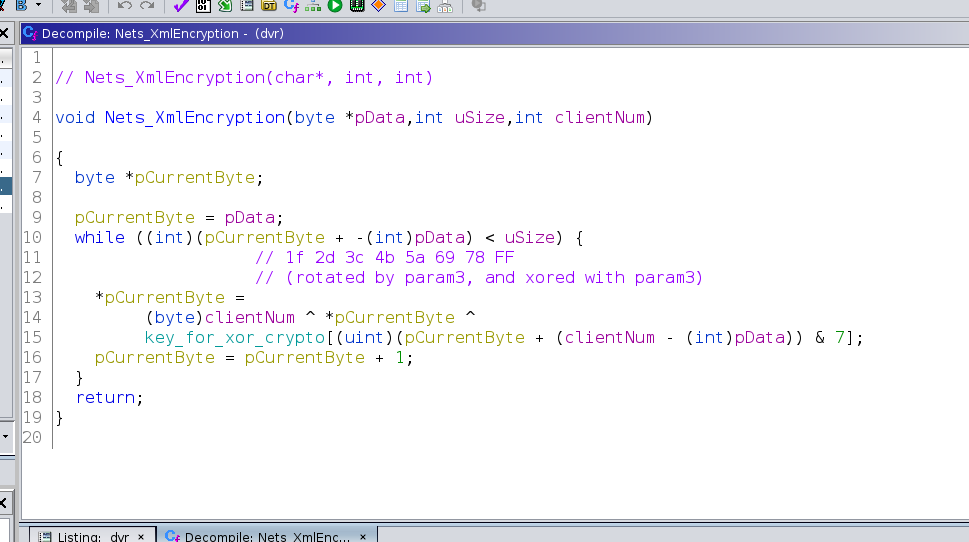
No engineering lessons had been learned during the redesign, and the influence of Charlie was alive and well! Here is the Charlie Scrambler back in force, but without the mixing step, and with a shorter key.
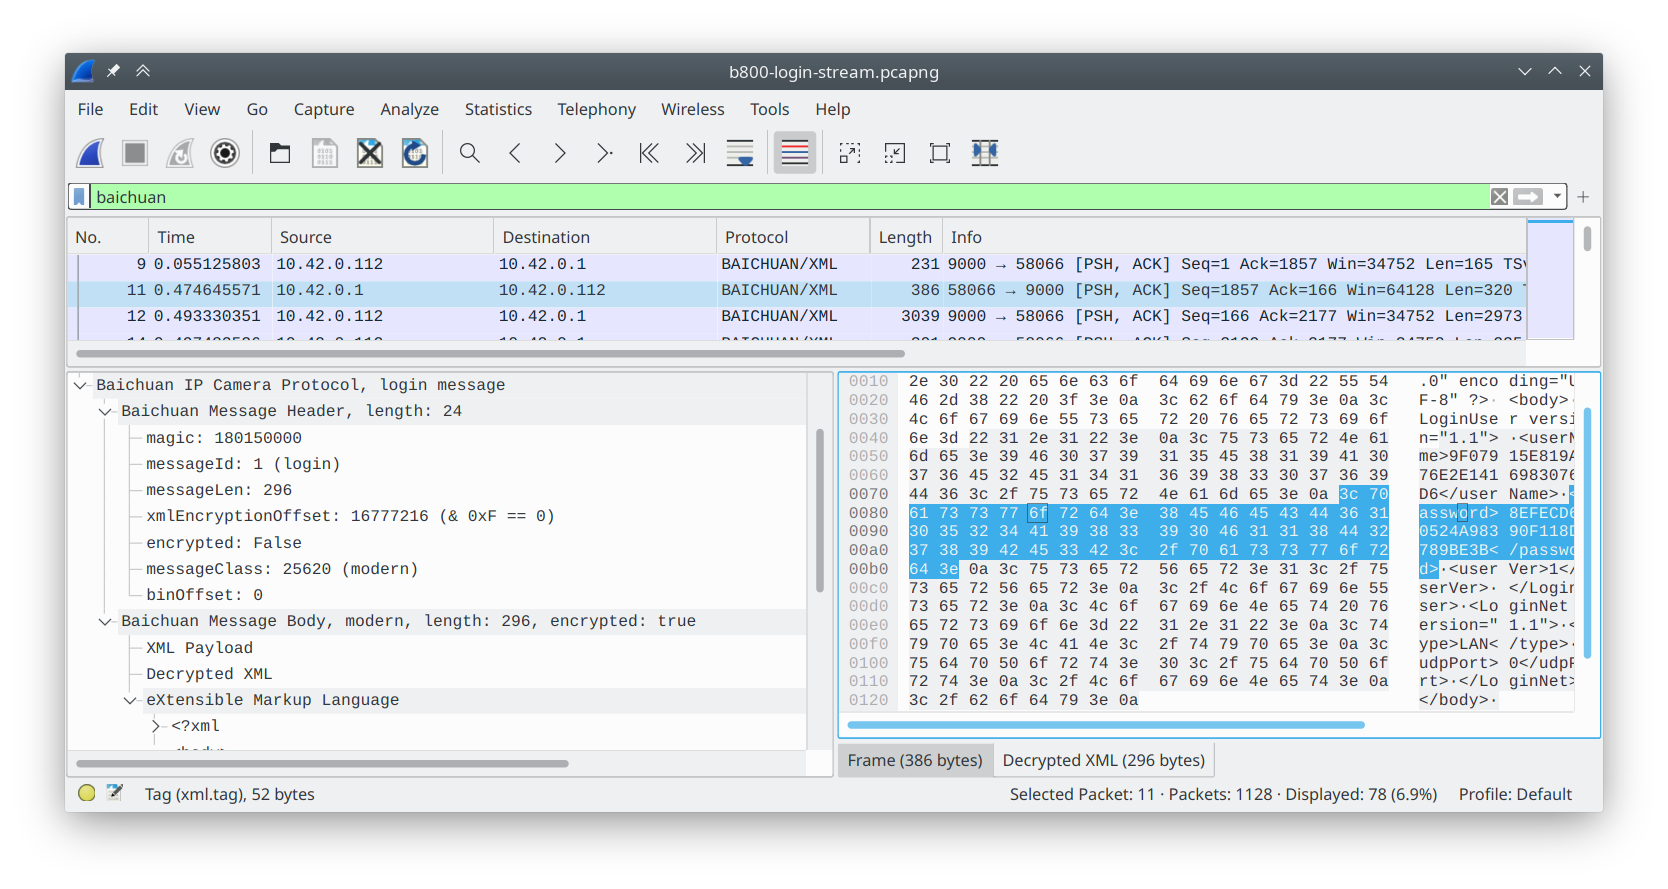
Fine, whatever. Implementing the Scrambler in my Wireshark dissector didn’t take very long—although I was briefly baffled by a header of varying length depending on the message type. Once implemented, I was greeted with this glorious sight:
Again, I highly recommend writing plugins for Wireshark. You can do it in Lua (or C if you’re that hardcore), and it only takes a couple hours to have a really nice debug tool.
A brief history of the Baichuan protocol
I won’t bore you with the gory details, but I’ll summarize my findings. The Baichuan protocol has had several iterations over the years. The very oldest seem to be UDP-based, using a proprietary SDK called TUTK, illicit copies of which can conveniently be found on GitHub. This is no longer used; it’s not even present in the camera code.
The next variant is indeed a plaintext “bag of structs”, which consists of a header and a body specified by a message ID in the header. This “legacy variant” is briefly used on the B800 so that both clients can negotiate an upgrade to the “modern variant,” which is the scrambled XML-based scheme you see above.
On top of this, modern messages can optionally have a payload. A certain XML message switches the entire message ID into “binary mode,” which supplies a raw data stream in subsequent messages. When the client sends a video-start command, the camera replies with a binary stream containing raw H.265 video. On top of that, the payload can also be more encrypted XML, separate from the main XML for some reason.
On the whole, it’s really quite a pain to parse.
Neolink: a new client
Once my Wireshark dissector was humming along, it was time to write a new client. I wanted my software to be fast, high-level, and correct, since it would be part of a security system setup.
That’s right: I rewrote Reolink’s software in Rust.

Well, not exactly. Neolink is a new client completely from scratch. It speaks the same Baichuan protocol as the camera, and it extracts the video and forwards it to another real NVR client like Blue Iris over RTSP. The parsing code is somewhat hairy4, but other than that, it’s straightforward.
Getting the video data
Here’s all the client is capable of right now. It’s pretty easy to read if you want to look at the source.
- Send a legacy login message to get the camera to “upgrade” to modern messages. Note: this uses plain MD5 encryption for your password, another, um, interesting design choice. Use a password that isn’t in a rainbow table!
- Send a modern login message to actually authenticate to the camera.
- Send a start video request:
let start_video = Bc::new_from_xml(
    BcMeta {
        msg_id: MSG_ID_VIDEO,
        client_idx: 0,
        encrypted: true,
        class: 0x6414,
    },
    BcXml {
        preview: Some(Preview {
            version: xml_ver(),
            channel_id: 0,
            handle: 0,
            stream_type: "mainStream".to_string(),
        }),
        ..Default::default()
    });

sub_video.send(start_video)?;
- Spit out the binary data when it’s received:
loop {
    let msg = sub_video.rx.recv_timeout(self.rx_timeout)?;
    if let BcBody::ModernMsg(ModernMsg { binary: Some(binary), .. }) = msg.body {
        data_out.write_all(binary.as_slice())?;
    }
}
Wrap it in maroon and white, er, RTSP5
For this part of the program I reached for Gstreamer, which ships with an RTSP server. Gstreamer is… complex. However, their examples are fantastic; they even provided a sample RTSP server in Rust!
The general approach for feeding Gstreamer data from an arbitrary part of your program is to use a block called an appsrc.
This lets you get a callback whenever Gstreamer wants data, or alternatively just push data whenever you have some and let Gstreamer handle scheduling it.
The latter approach is the one I went with here, since the camera doesn’t wait for a signal to send video data.
I wrapped everything in a Gstreamer pipeline:
appsrc name=baichuan is-live=true emit-signals=false max-bytes=0 ! h265parse ! rtph265pay name=pay0
Testing it with Blue Iris
The moment of truth arrived… could Blue Iris connect to my RTSP server and actually display the video?
You bet.
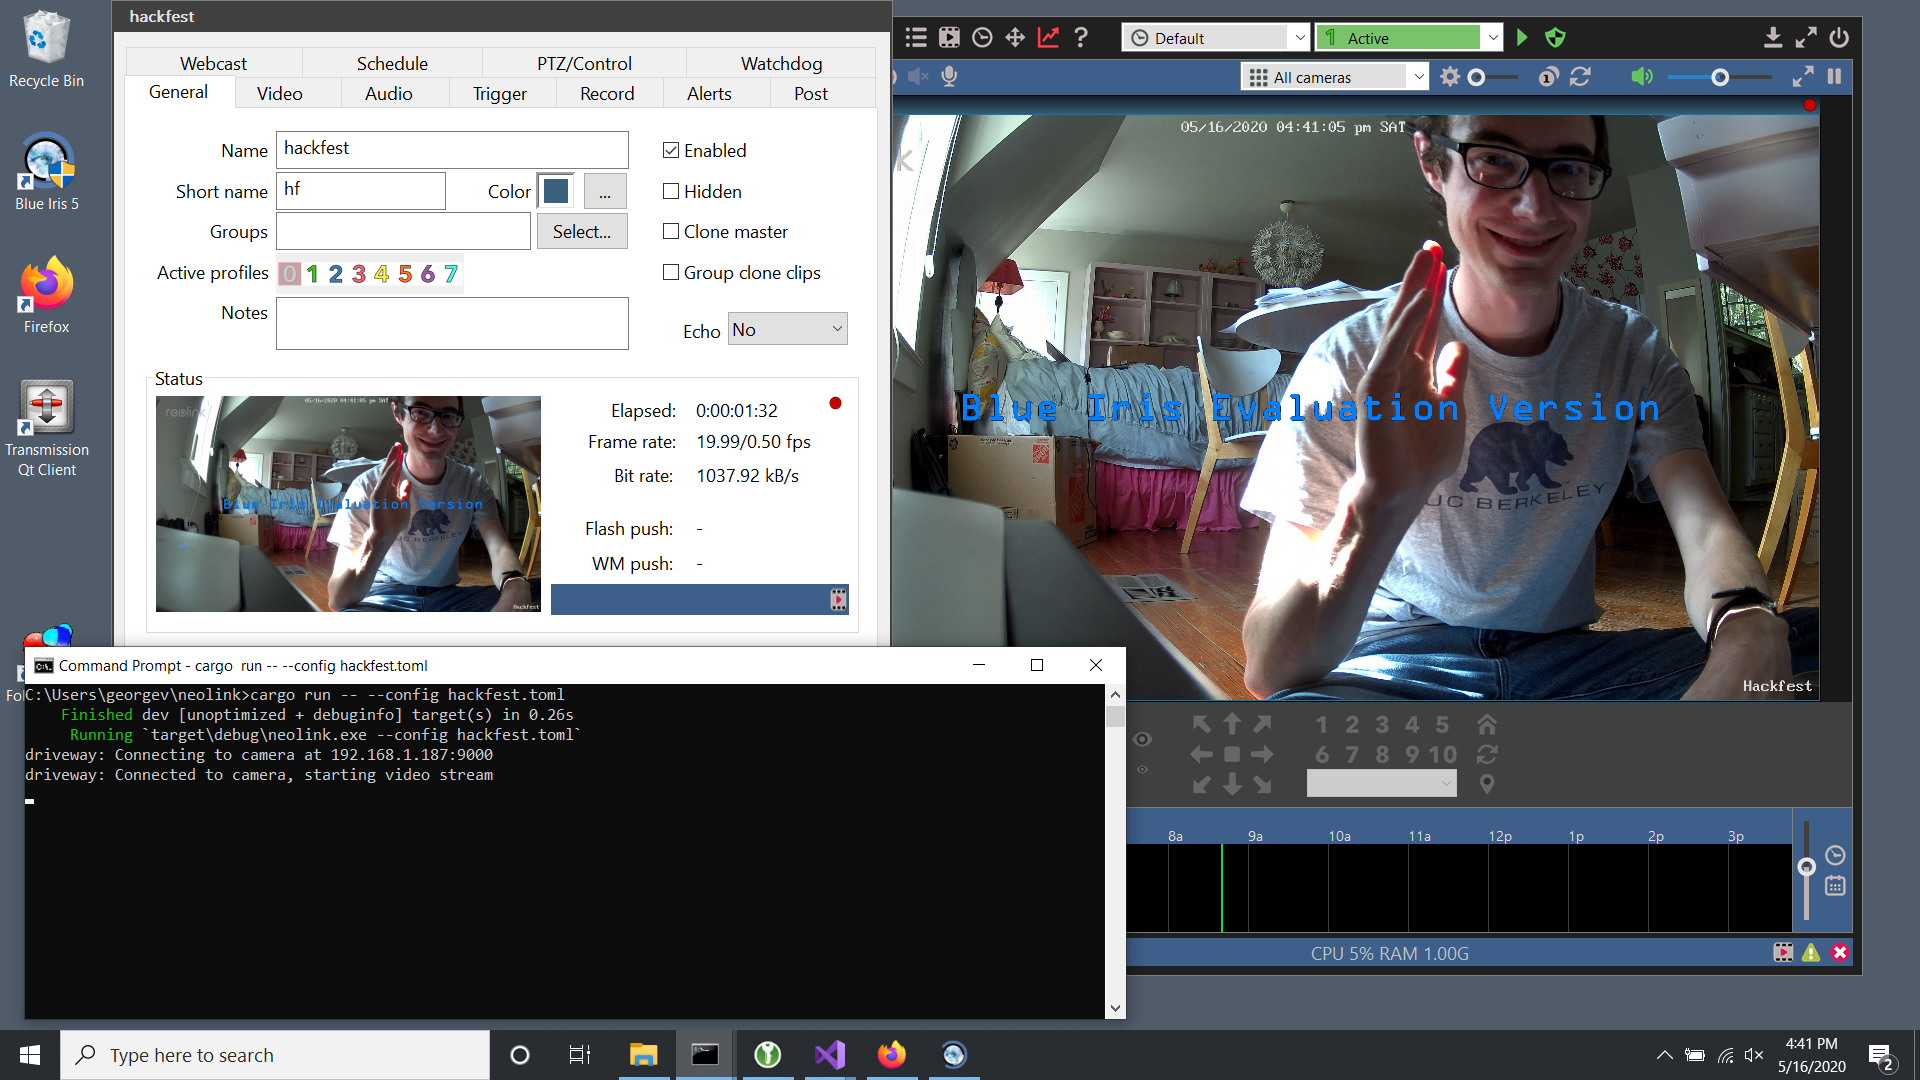
I present… me! In glorious 4K!
Future work
I’ve been soak-testing Neolink for a while now and I think it’s pretty stable. Going forward I’m packaging it up as a real Windows service (not a command line program) to run alongside Blue Iris on my server. Go look at it and download it for yourself!
I’m also interested in getting Neolink working with other “NVR only” Reolink cameras, of which there are quite a few. So far I haven’t purchased any other hardware, so if you have one of these cameras, please get in touch so we can test it. It might Just Work out of the box. Port scan your cameras! If they have port 9000 available, chances are good that they speak the Baichuan protocol.
This project was a “just right” intro to reverse engineering. Low-security systems like these let you teach yourself the principles without actively trying to thwart reverse engineering. I taught myself a lot, and I hope it provides a lot of value for folks who own these cameras.
Finally, some shameless self-promotion: embedded Linux systems are actually pretty approachable! If you’d like to learn how to do this kind of thing, you might be interested in my Mastering Embedded Linux series, designed to help you become an expert in hacking low-cost embedded Linux systems just like this camera.
If you enjoyed this, you can subscribe to my blog updates, or leave a comment below. Thanks for reading!
-
The Reolink support forums always claim that their pages were “updated 8 hours ago.” This is obvious nonsense. They do update fairly frequently, but not constantly. ↩︎
-
This is exactly the point of secure boot schemes, where the immutable boot ROM validates code against immutable encryption keys, preventing tampering. Needless to say, this camera does not implement such niceties. ↩︎
-
binwalkalso turns up a bunch of false positives, which are easy to ignore because they don’t have nice round offsets. ↩︎ -
Seriously, having packet decode be stateful is just ridiculous. ↩︎
-
Yes, I’m a proud Mississippi State University bulldog. You too can attend and become a computer engineer! ↩︎